Deploying Python Machine Learning models on RunPod, without any docker-stress


What if I told you, you can now deploy pure python machine learning models with zero-stress on RunPod! Excuse that this is a bit of a hacky workflow at the moment. We'll be providing better abstractions in the future!
Prerequisites and Notes
- The tutorial only works for containers installed purely from pypi, so system installed packages unfortunately won't work with this tutorial
- A good understanding of virtual environments in python
- A network drive, click here to learn more about it
- A decent amount of knowledge on how to use the terminal
For the ease of this tutorial, I am going to do all this in the Jupiter interface (for editing python files), however, this tutorial may be repeated in vscode, if that is a coding environment you are more comfortable with
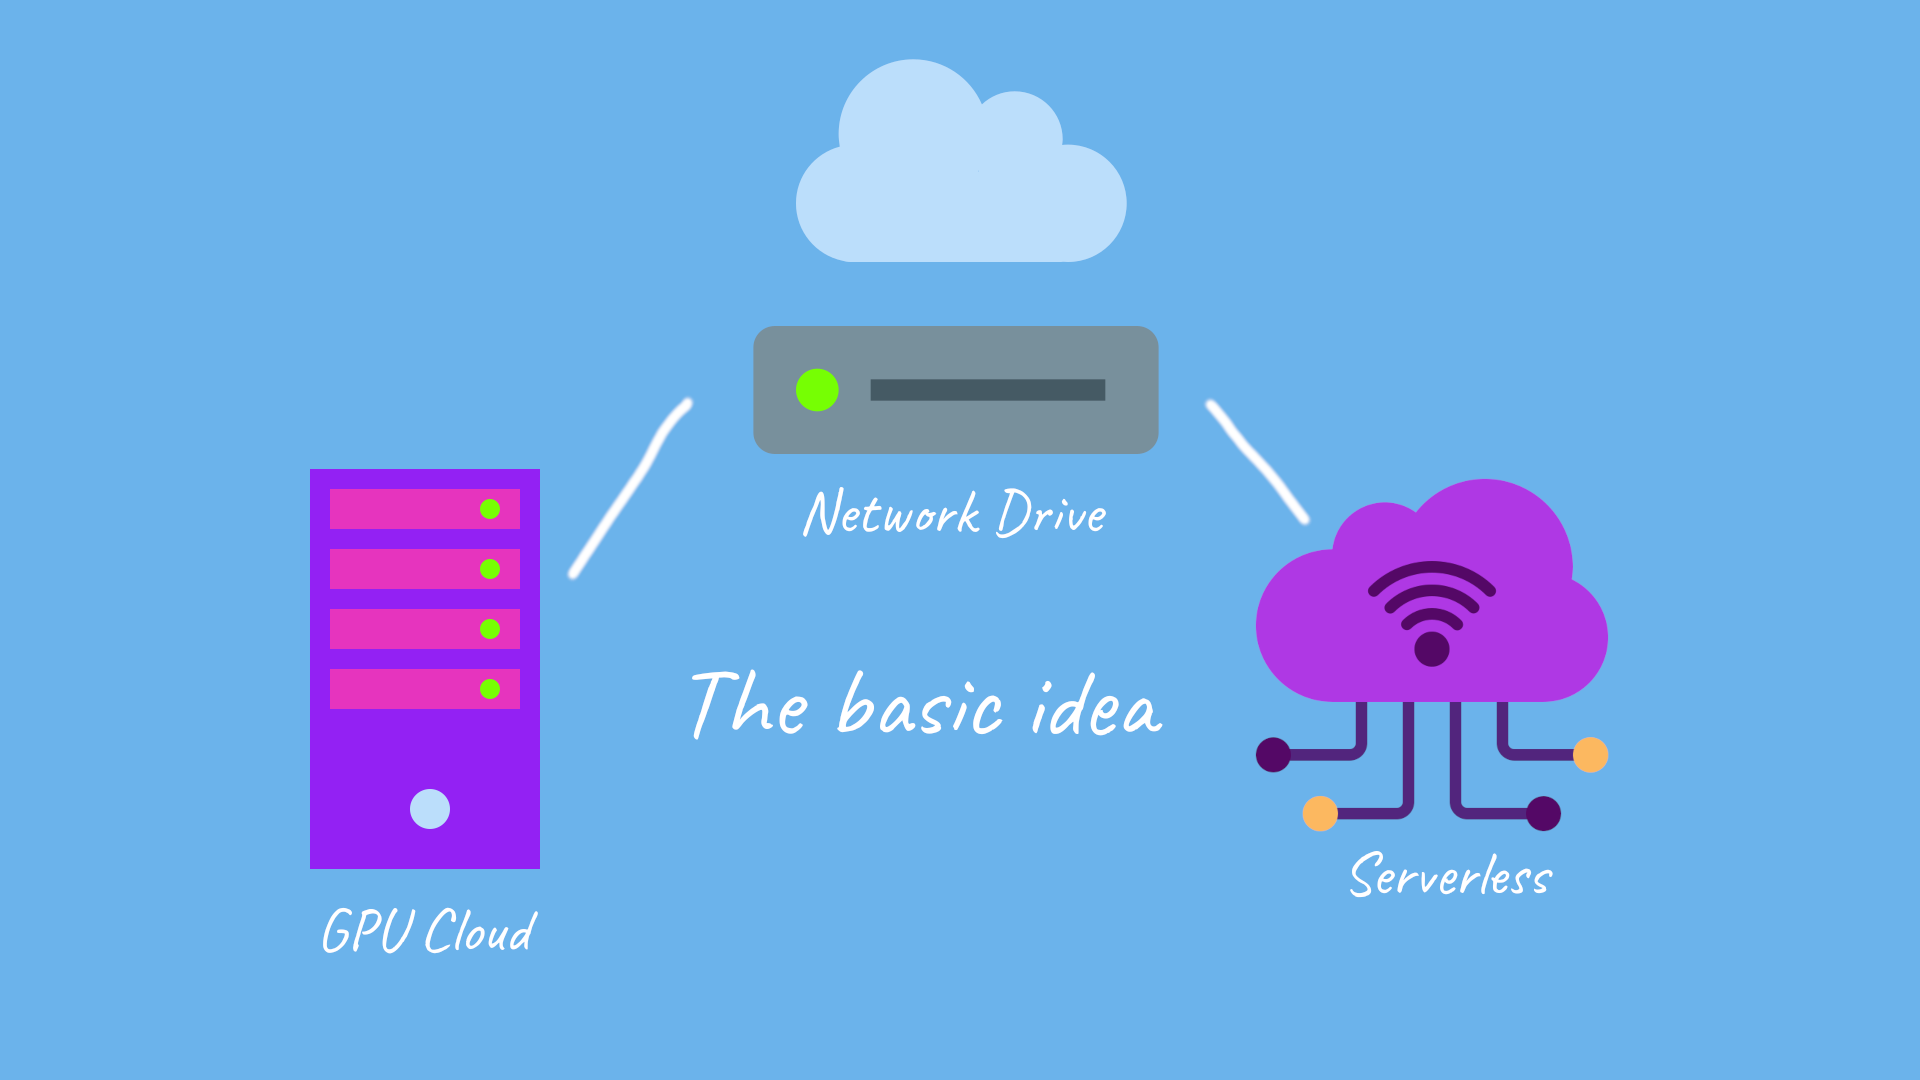
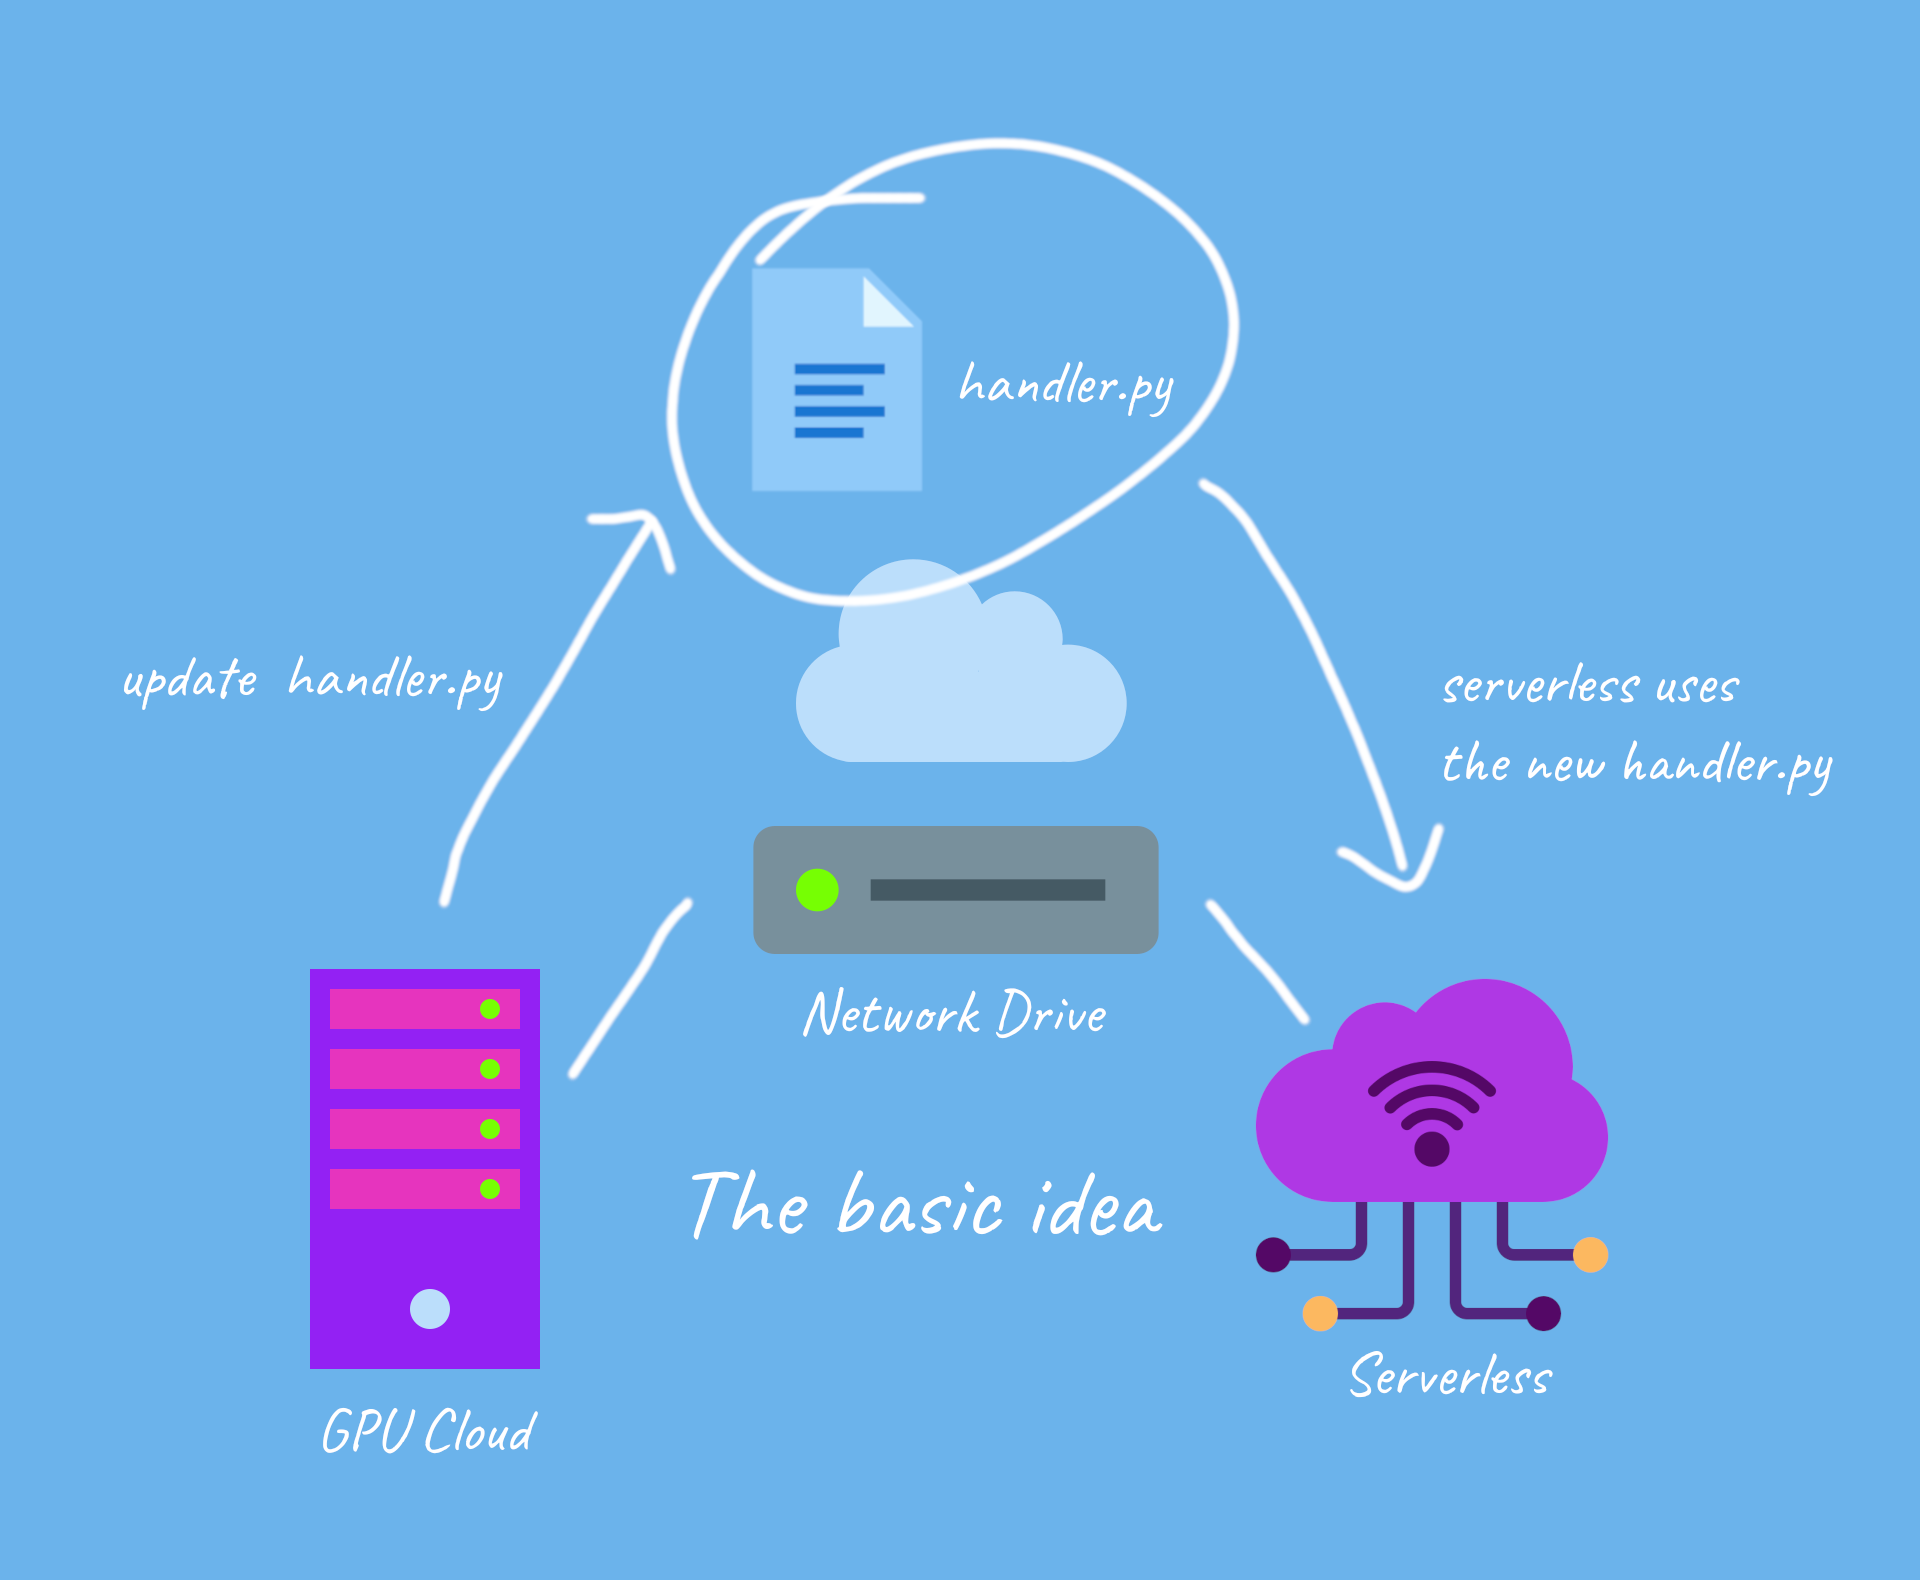
The Grand Idea
and for updates
Lets Get Started!
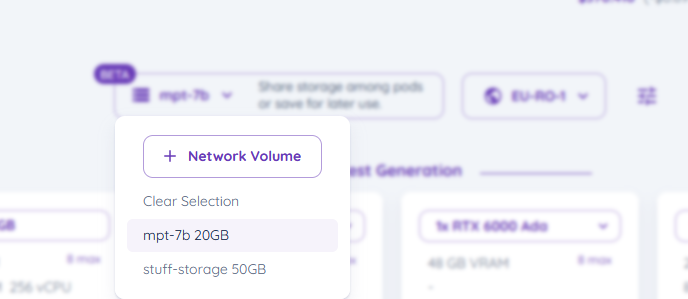
- Select your network drive in secure cloud, and click it to select it, it should appear on your top bar
2. Lets start a RunPod Pytorch 2 (you can use any runtime container that you like) template with RunPod, by selecting the pod you wish for with the template
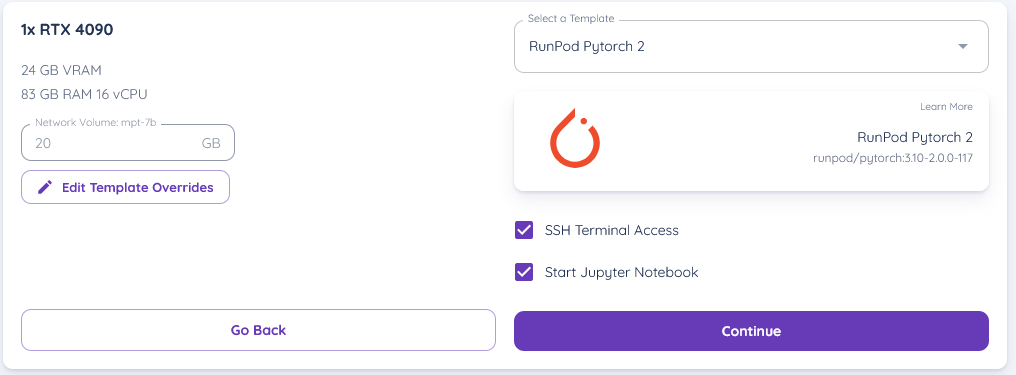
(ensure your network drive is selected on the pod)
3. start the pod and get into the Jupyter Lab interface, and then open a terminal
4. now in the terminal, create a python virtual environment by typing in (ensure your current directory is /workspace)
update ubuntu with
apt update; apt install python3.10-venv
then create a virtual environment
python -m venv venv
this should create a virtual environment in /workspace
next we activate the virtual environment with
source venv/bin/activate
5. for now, I am going to develop and deploy bark, a text-to-speech engine that produces realistic sounding audio
lets install the package in the terminal by typing, as well as runpod and scipy
pip install runpod scipy git+https://github.com/suno-ai/bark.git
6. lets create a python file, and type in the following code into it, lets name it "handler.py" and save it in /workspace/handler.py
from bark import SAMPLE_RATE, generate_audio, preload_models
from scipy.io.wavfile import write as write_wav
import runpod
import io
import base64

preload_models()

def handler(event):
    audio_array = generate_audio(event['input']['transcript'])
    byt = io.BytesIO()
    write_wav(byt, SAMPLE_RATE, audio_array)
    byt.seek(0)
    data = byt.read()
    return {
        "wav" : base64.b64encode(data).decode('ascii')
    }

runpod.serverless.start({"handler": handler})code explanation :
this basically returns the generated audio as a file
7. lets write a startup file - this will be the code used to start docker up with serverless, we'll save this in "/workspace/pod-startup.sh"
# by default the network volume is mounted to /runpod-volume in serverless, while /workspace in regular pods
export RUNPOD_NETWORK_VOLUME_PATH="/workspace"

if [ -n "$RUNPOD_ENDPOINT_ID" ]; then
    export RUNPOD_NETWORK_VOLUME_PATH="/runpod-volume"
fi

export HF_HOME="$RUNPOD_NETWORK_VOLUME_PATH/hf-files"
export XDG_CACHE_HOME="$RUNPOD_NETWORK_VOLUME_PATH/cache"
export PATH="$RUNPOD_NETWORK_VOLUME_PATH/venv/bin:$PATH"

python $RUNPOD_NETWORK_VOLUME_PATH/handler.py
Testing the API out on runpod - in GPU cloud
- You can test the api out by creating a testing json in /workspace/test_input.json
{
    "input": {
        "transcript" : "Hey, I generated this audio with runpod"
    }
}
2.
1. deactivate the venv we're in in the terminal by typing deactivate
2. try sh pod-startup.sh to test it out
This should show the generation process, and we should be able to see the process being run!
Testing the API out via serverless
- Go ahead to serverless and lets create a new serverless template
Goto https://www.runpod.io/console/serverless/user/templates and create a new template
2. and set its variables to the following

3. now setup a runpod serverless api with your network volume connected, using the template
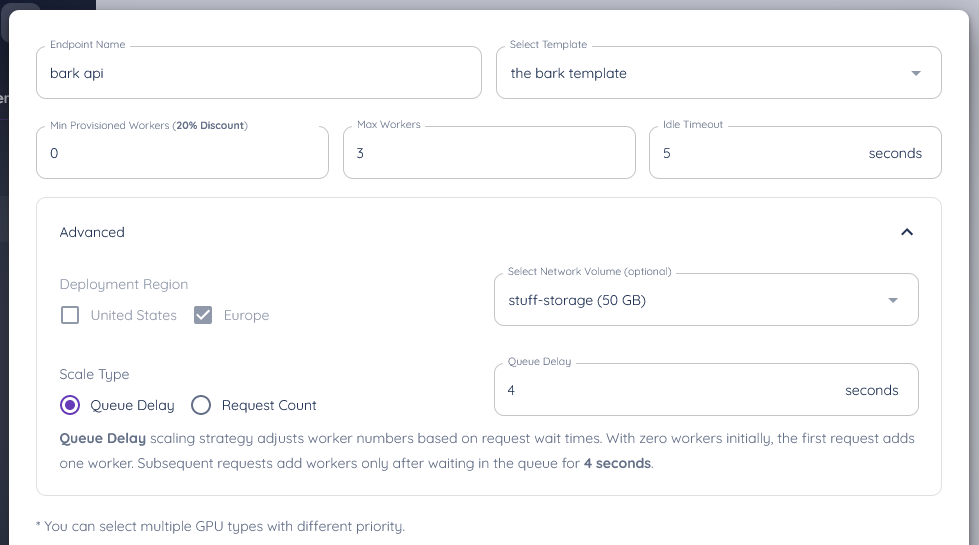
ensure you connect it to your network volume, and your template
and ta-da, you've setup your api to it!
Actually test it out!
you can now make requests to it, so here's some sample code to make a request and download a file (ensure you install the requests the library for this with pip install requests)
import requests
import time
import base64

headers = {
    "accept": "application/json",
    "content-type": "application/json",
    "authorization": "<replace-api-key-here>"
}

input = {
    "transcript" : "Hey, I generated this audio with runpod"
}

out = requests.post("https://api.runpod.ai/v2/<replace-api-id-here>/run", headers=headers, json={"input":input}).json()

id = out['id']

while out["status"] != "COMPLETED":
    out = requests.get(f"https://api.runpod.ai/v2/<replace-api-id-here>/status/{id}", headers=headers).json()
    time.sleep(1)
    print(out)

with open("abc.wav",'wb') as f:
    ascii = out["output"]["wav"].encode("ascii")
    bytes_decoded = base64.b64decode(ascii)
    f.write(bytes_decoded)
and ta-da!, your api works!