Run your Own AI from your iPhone Using RunPod

Cell phones have provided users access to an AI such as iPhone’s Siri. With the emergence of cloud-based open-source LLMs, you can now run a personalized AI on your iPhone with RunPod’s offerings. RunPod allows you to have the resources to run the various (and very large) open source LLMs as well as fine tune them for customized needs.
In this tutorial, you will learn how to deploy a model on RunPod with Ollama and use the Shortcuts app on your iPhone to connect with the model. That’s right, you do not need to code and publish an app. When finished, you’ll be able to open the Shortcuts app, speak to it, and receive the dictated message from your new AI.
Prerequisites
The tutorial assumes you have a RunPod account with credits and a device running iOS 15 or later. No other prior knowledge is needed to complete this tutorial.
Step 1: Start a PyTorch Template on RunPod
You will create a new Pod with the PyTorch template. In this step, you will set overrides to configure Ollama.
- Log in to your RunPod account and choose + GPU Pod.
- Choose a GPU Pod like
A40. - From the available templates, select the latest PyTorch template.
- Select Customize Deployment.
- Add the port
11434to the list of exposed HTTP ports. This port is used by Ollama for HTTP API requests. - Add the following environment variable to your Pod to allow Ollama to bind to the HTTP port:
- Key:
OLLAMA_HOST - Value:
0.0.0.0
- Key:
- Add the port
- Select Set Overrides, Continue, then Deploy.
This setting configures Ollama to listen on all network interfaces, enabling external access through the exposed port. For detailed instructions on setting environment variables, refer to the Ollama FAQ documentation.
Once the Pod is up and running, you'll have access to a terminal within the RunPod interface.
Step 2: Install Ollama
Now that your Pod is running, you can log in to the web terminal. The web terminal is a powerful way to interact with your Pod.
- Select Connect and choose Start Web Terminal.
- Make note of the Username and Password, then select Connect to Web Terminal.
- Enter your username and password.
- To ensure Ollama can automatically detect and utilize your GPU, run the following commands.
apt update
apt install lshw
- Run the following command to install Ollama and send to the background:
curl -fsSL https://ollama.com/install.sh | sh && ollama serve > ollama.log 2>&1 &This command fetches the Ollama installation script and executes it, setting up Ollama on your Pod. The ollama serve part starts the Ollama server, making it ready to serve AI models. Note that when the web terminal closes, the server will too — so once you're up to speed, you may want to run it in tmux, Jupyter Notebook, or some other method that keeps the server open persistently.
Now that your Ollama server is running on your Pod, add a model.
Step 3: Run an AI Model with Ollama
To run an AI model using Ollama, pass the model name to the ollama run command:
ollama run [model name]
ollama run mistral
Replace [model name] with the name of the AI model you wish to deploy. For a complete list of models, see the Ollama Library.
This command pulls the model and runs it, making it accessible for inference. You can now begin interacting with the model directly from your iPhone.
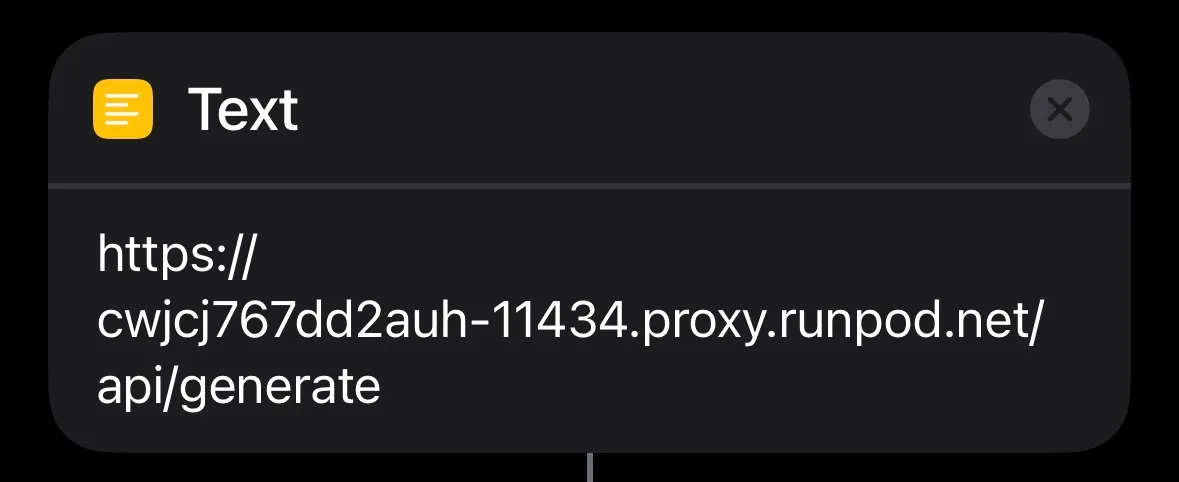
On the RunPod interface, you can click Connect for your pod followed by clicking HTTP Service to get the URL (ex: https://cwjcj767dd2auh-11434.proxy.runpod.net) to connect from your iPhone.

Step 4: Interact with Ollama via Shortcuts App
Open the Shortcuts app on your iPhone and follow these steps to build the Shortcut.
- Open Shortcuts App. Tap + (top-right) to create a new Shortcut.
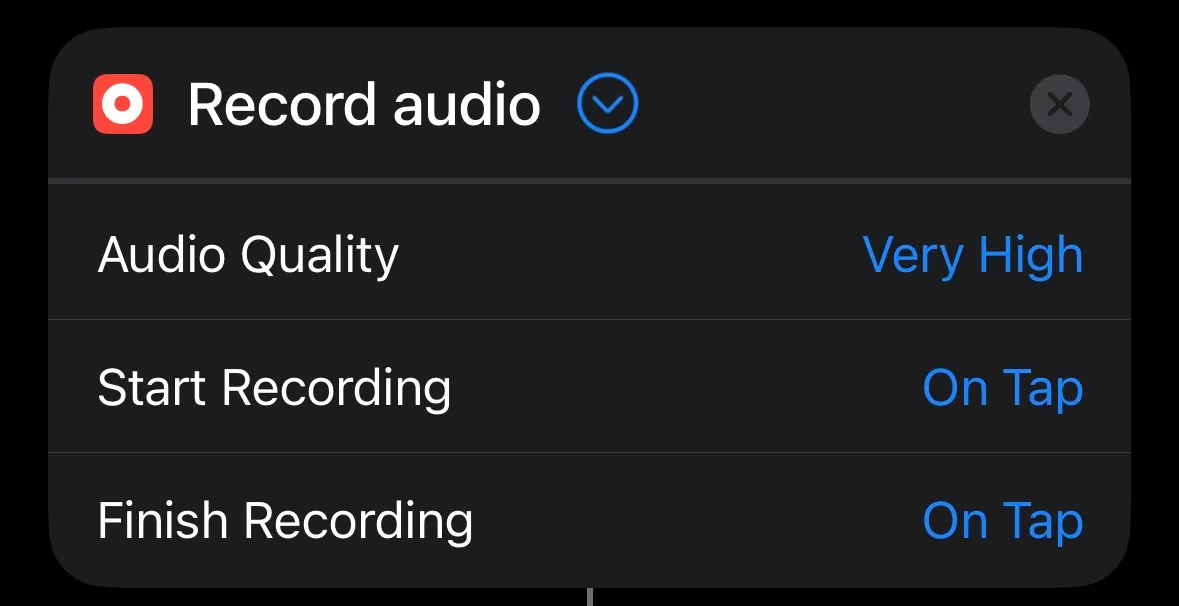
- Record Audio: • Search for “Record Audio” and add it.
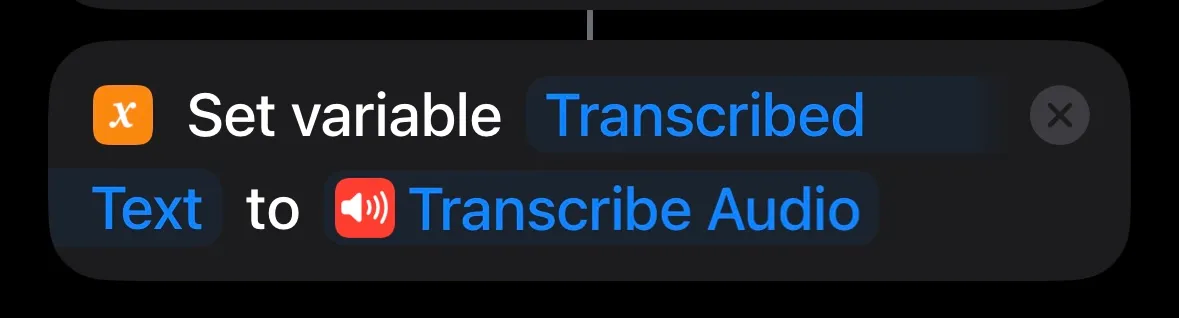
- Transcribe Audio: Search for “Transcribe Audio” and add it. Add “Recorded Audio”.

- Search for “Set variable”. Add “Transcribed Text” and “Transcribed Audio".
- Search for “Text”. Add the url of the pod launched in RunPod and make sure to add /api/generate to the end.
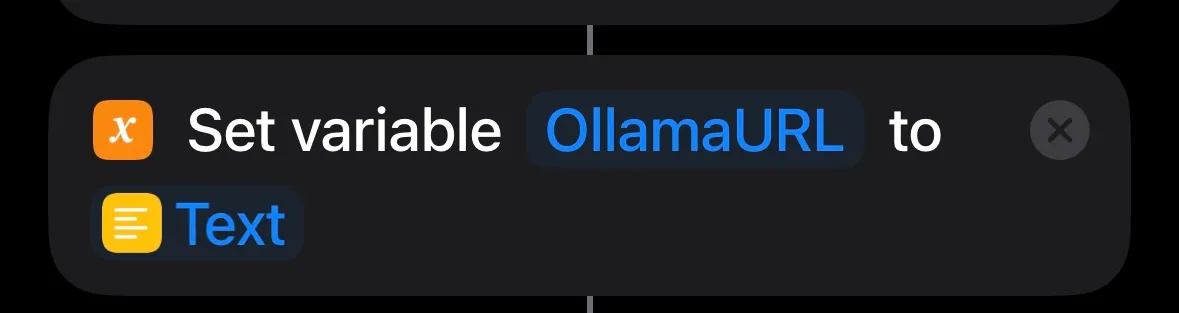
- Search for “Set variable”. Add “OllamaURL” and set Text.
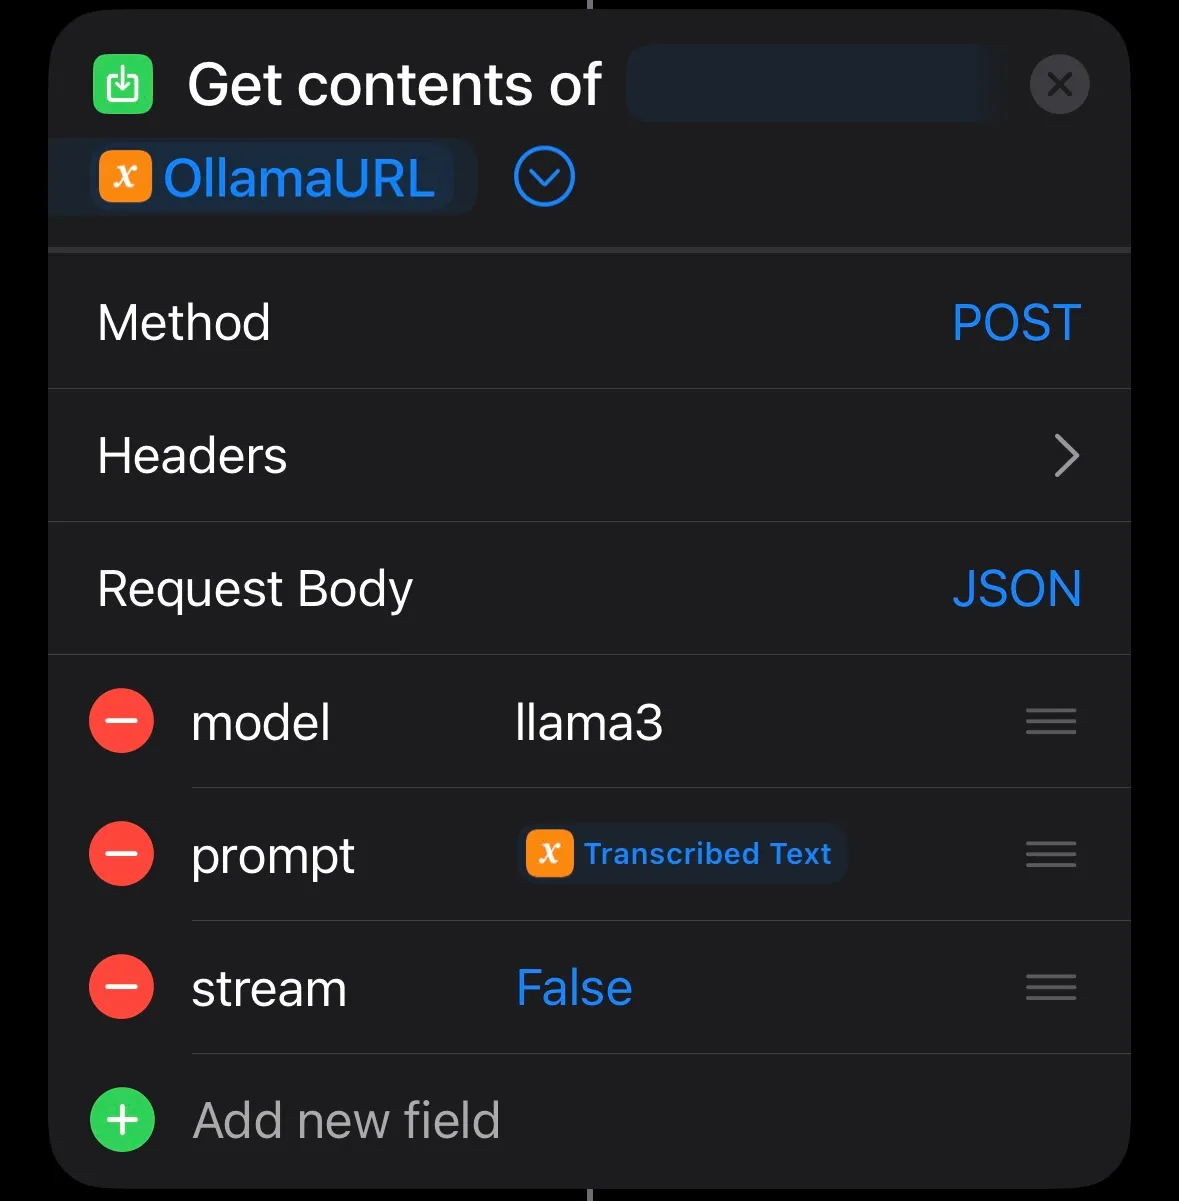
- Search for “Get contents of". Add OllamaURL. Set the parameters like shown below. Change the model value to what you are running in your pod.

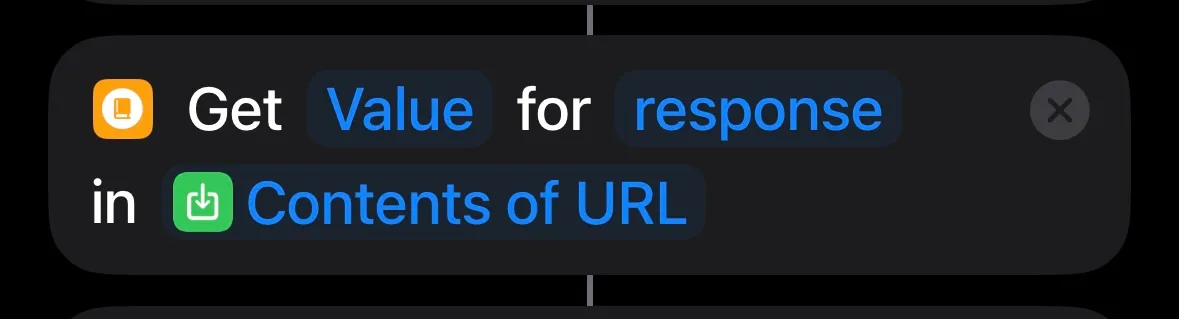
- Search for “Get Dictionary Value”. Add Value, response, and Contents of URL.
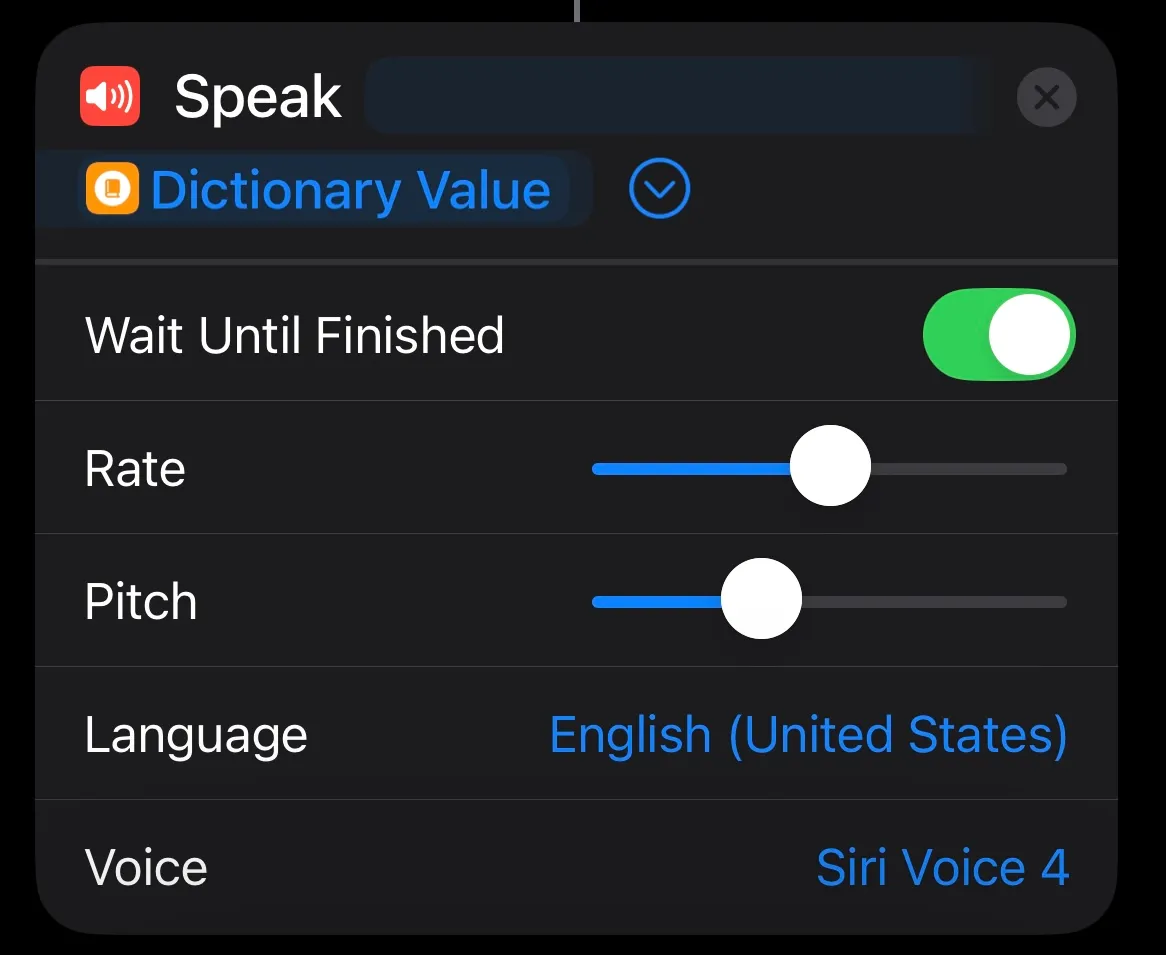
- Search for “Speak”. Add Dictionary Value.
Now you can press Play on the bottom right to start talking to your new AI. Additionally, you can click the info button and add an icon to the Home Screen or even share it with other people.
Conclusion
In this tutorial, you built an AI that you can talk to using your phone without writing any code. You can share it with your friends and family. With RunPod, you can leverage the resources to run models of all different sizes.
Next Steps
Consider enhancing your AI by:
- Add support for an access token: This adds a layer of security to who can speak to your AI.
- Try out different models: RunPod offers GPU resources of many sizes to handle models with billions of parameters.
- Fine tune a model: Teach a model new information, and let it learn what you want.