How to run SAM 2 on a cloud GPU with RunPod

What is SAM 2?
Meta has unveiled Segment Anything Model 2 (SAM 2), a revolutionary advancement in object segmentation. Building on the success of its predecessor, SAM 2 integrates real-time, promptable object segmentation for both images and videos, enhancing accuracy and speed. Its ability to operate across previously unseen visual domains holds significant promise for various fields, from creative video editing to scientific research. Check out this demo video showcasing SAM 2's video segmentation capabilities.
Demo video from Meta
What Makes SAM 2 Stand Out?
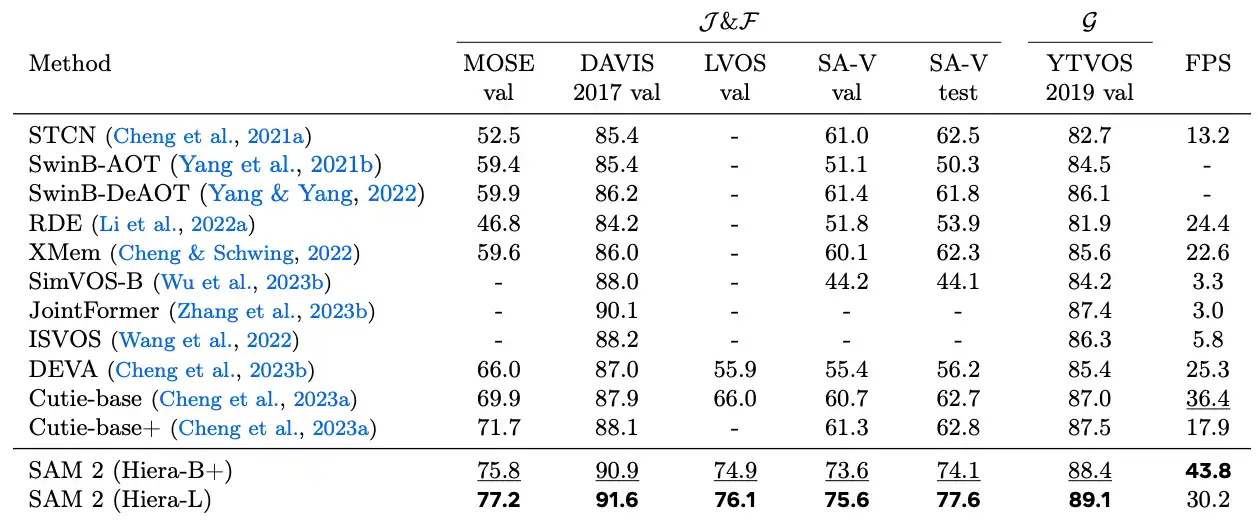
SAM 2 is the first unified model capable of real-time, promptable segmentation for both images and videos. It effectively handles complex motion, occlusion, and lighting variations, overcoming challenges that traditional segmentation models struggled with. The comparison below highlights SAM 2's performance against prior segmentation models, showcasing its superior segmentation benchmarks and frame processing speed, making it ideal for video processing.
Key Features
- Unified Image and Video Segmentation: SAM 2 seamlessly segments objects in both static images and dynamic videos.
- Zero-Shot Generalization: Excels in identifying objects across diverse and previously unseen visual content without custom adaptation.
- Promptable Segmentation: Users can provide prompts like clicks, bounding boxes, or masks to guide the segmentation process, making it intuitive and interactive.
- Real-Time Processing: With a processing speed of approximately 44 frames per second, SAM 2 supports real-time applications and experiences.
SAM 2's real-time processing capabilities allow it to handle video frames efficiently, making it suitable for applications requiring quick image and video segmentation. The model’s ability to process multiple objects simultaneously enhances its applicability in various scenarios. If you'd like to read more about how SAM 2 works, check out Meta's blog.
Try it for yourself
In this blog, we'll show you how you can get started with a simple SAM 2 use-case:
Prerequisites
- Create your RunPod account (heads up, you'll need to load at least $10 into your RunPod account to get started).
Deploy Pod and Open Jupyter Lab
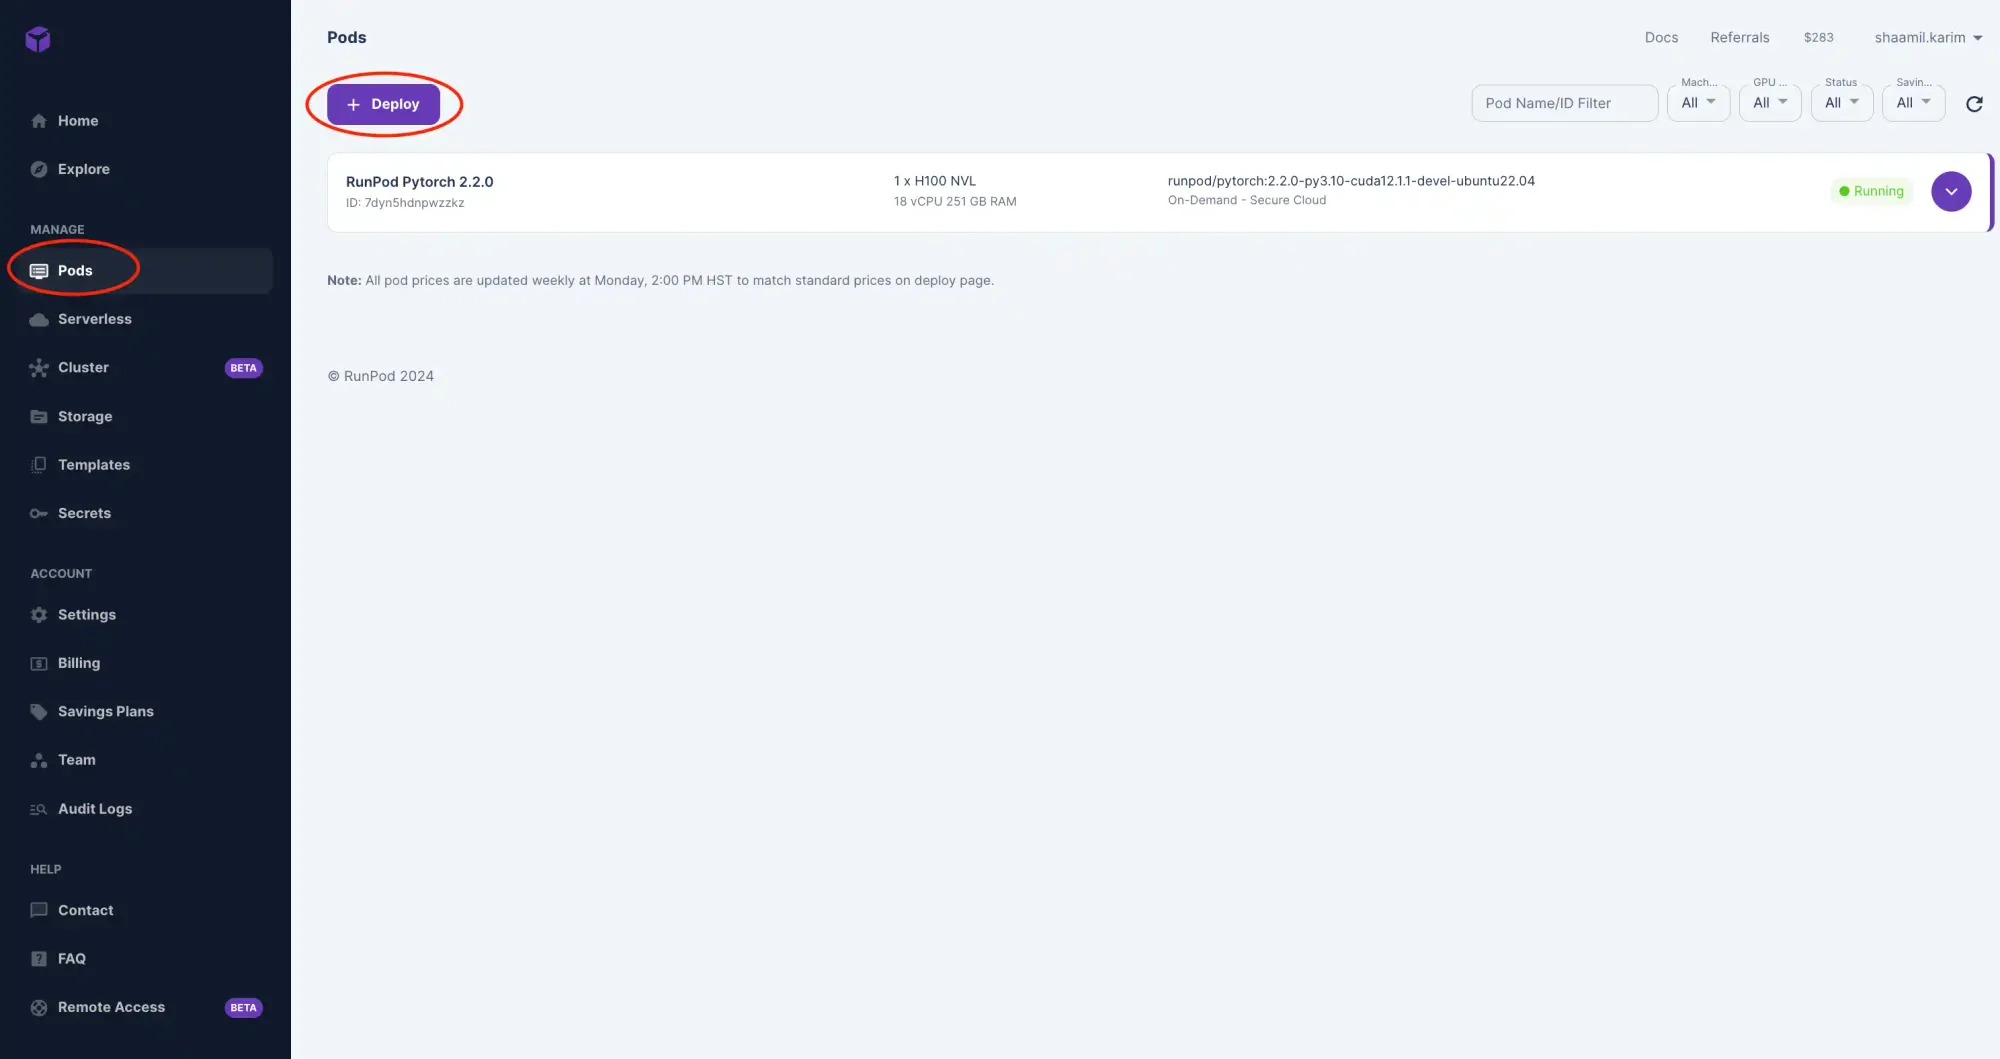
- Head to Pods and click Deploy.
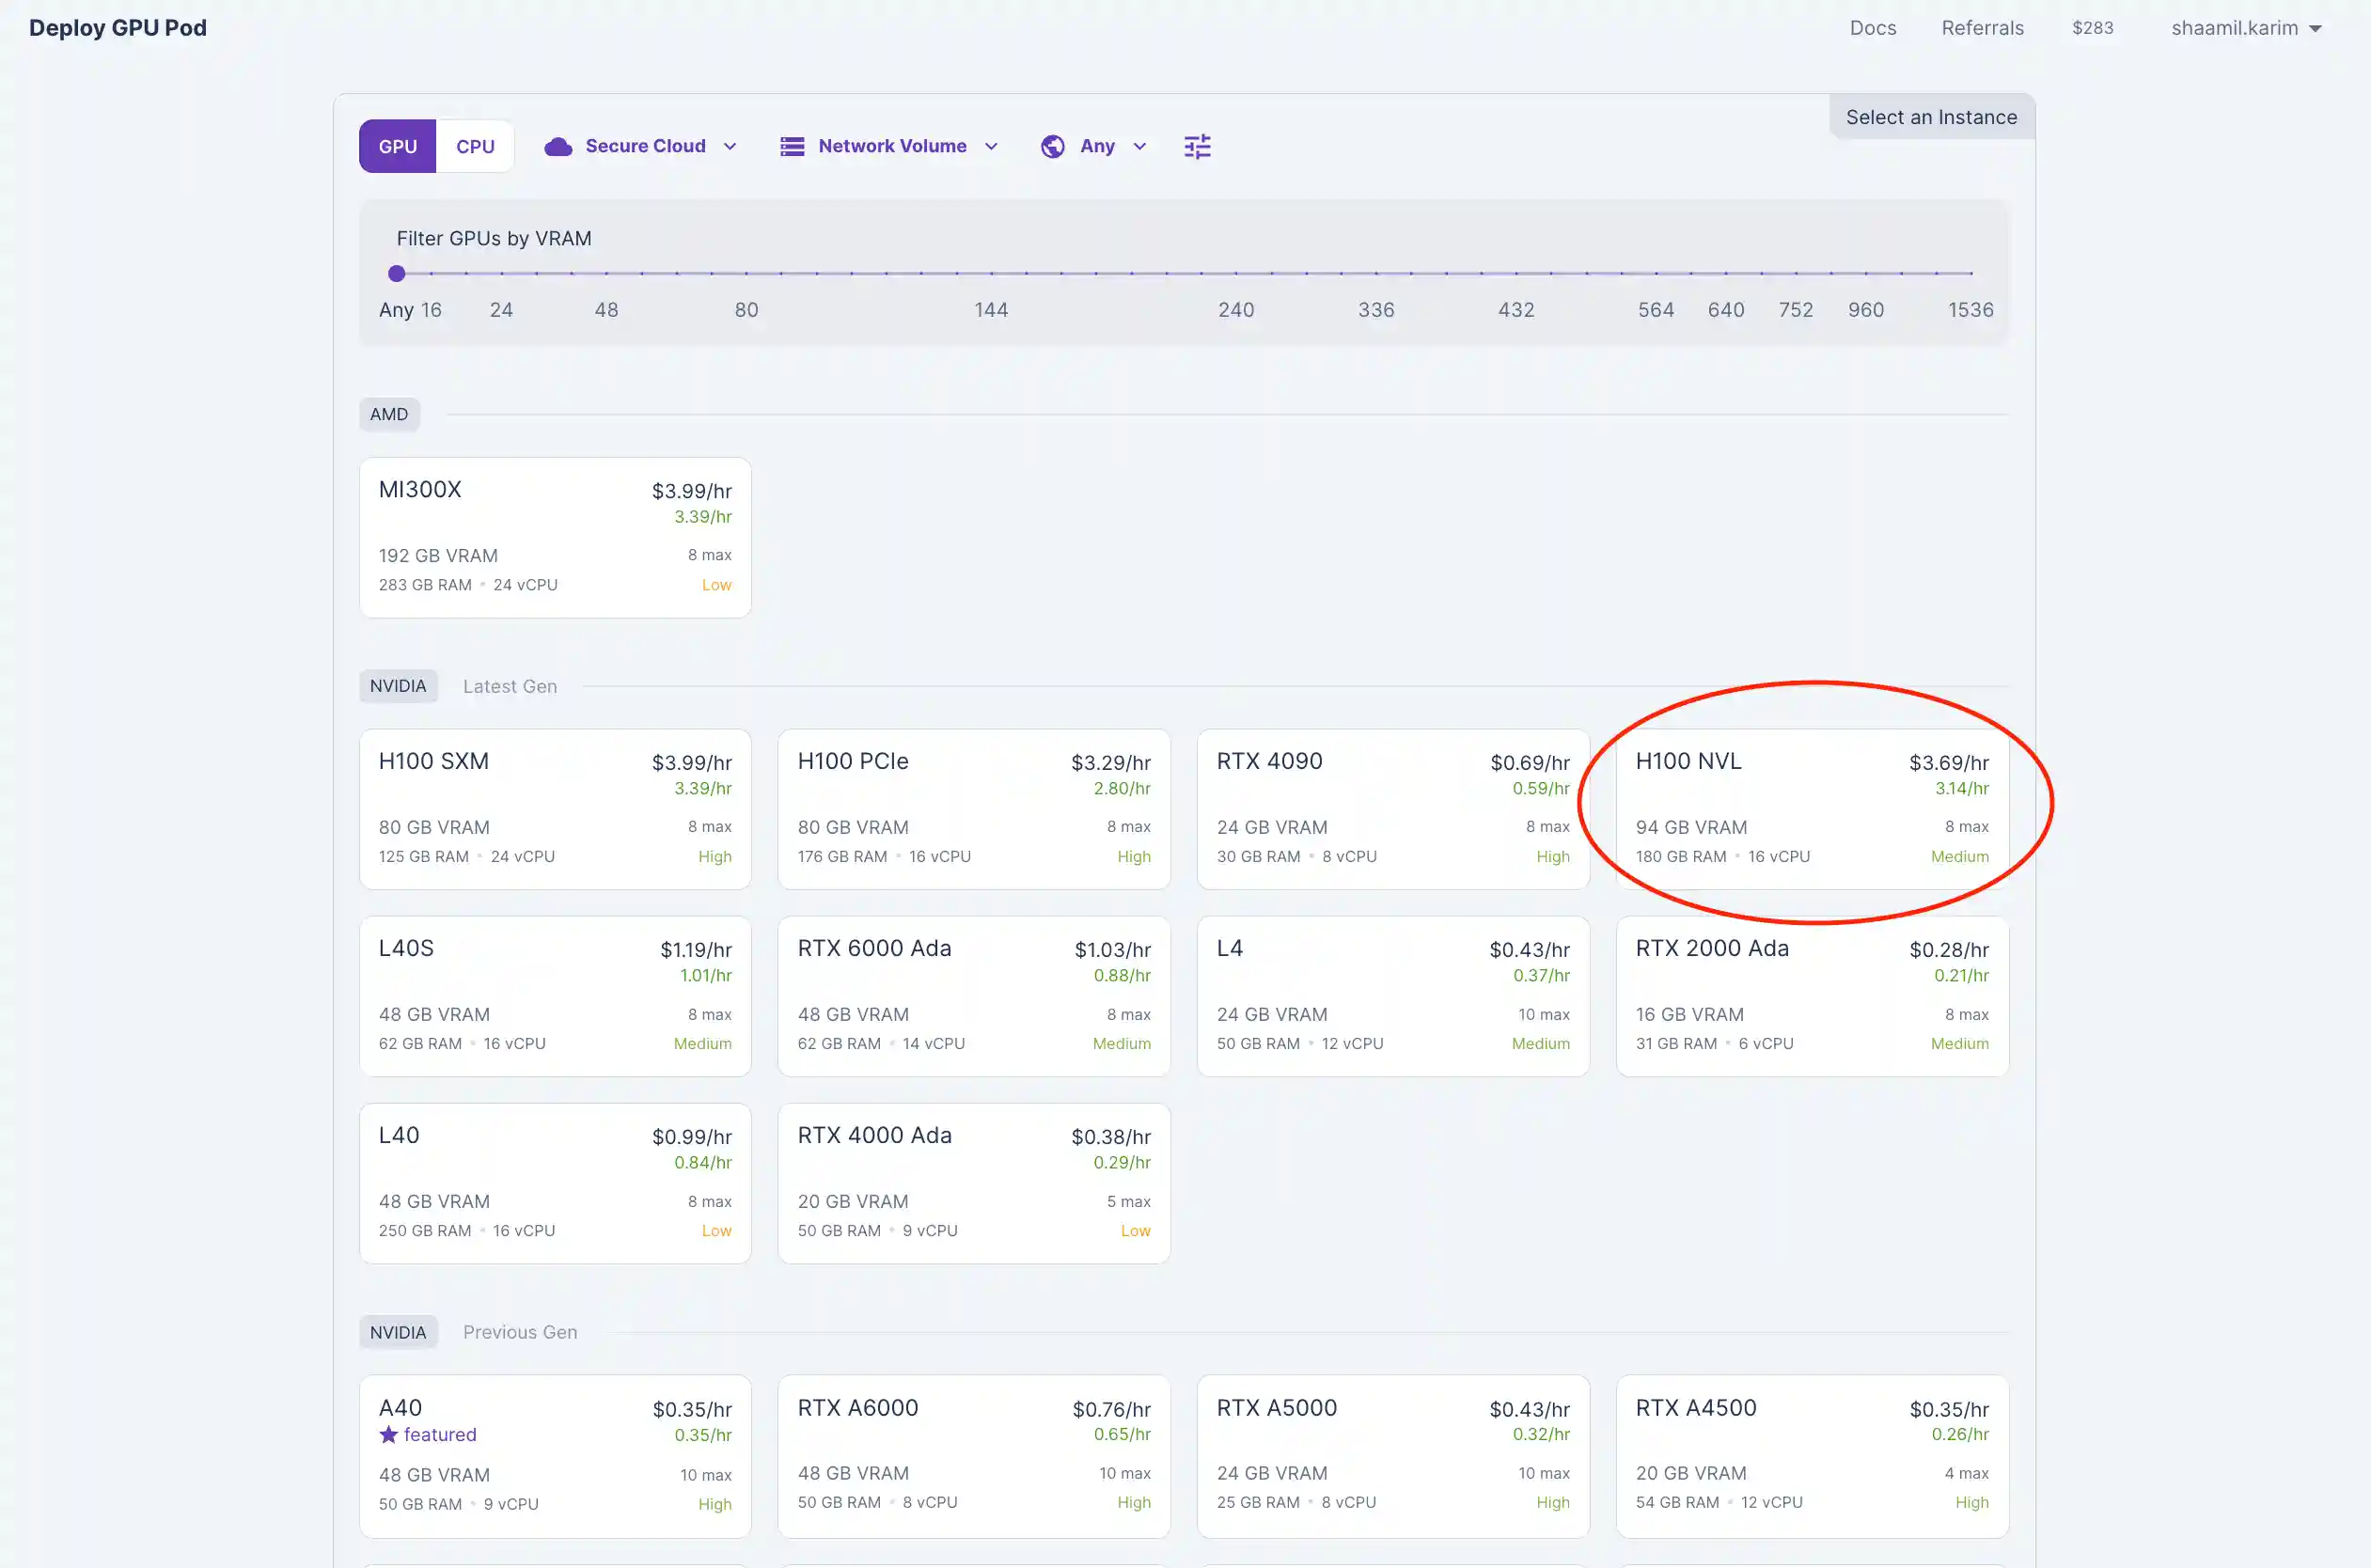
- Select Your GPU Configuration: Choose the GPU that best fits your performance needs and budget. For the fastest performance, I recommend the H100 NVL. However, you can opt for a more affordable GPU with lesser VRAM if that suits your requirements. For detailed guidance on selecting the right VRAM for your model, check out our blog on picking the right VRAM.
- Use Default Settings: The default settings provided should be sufficient for most use cases. Once you've configured your GPU, click deploy!
- Connect to Your Pod: Once deployed, navigate to the "Pods" section, locate your pod, and click "Connect."
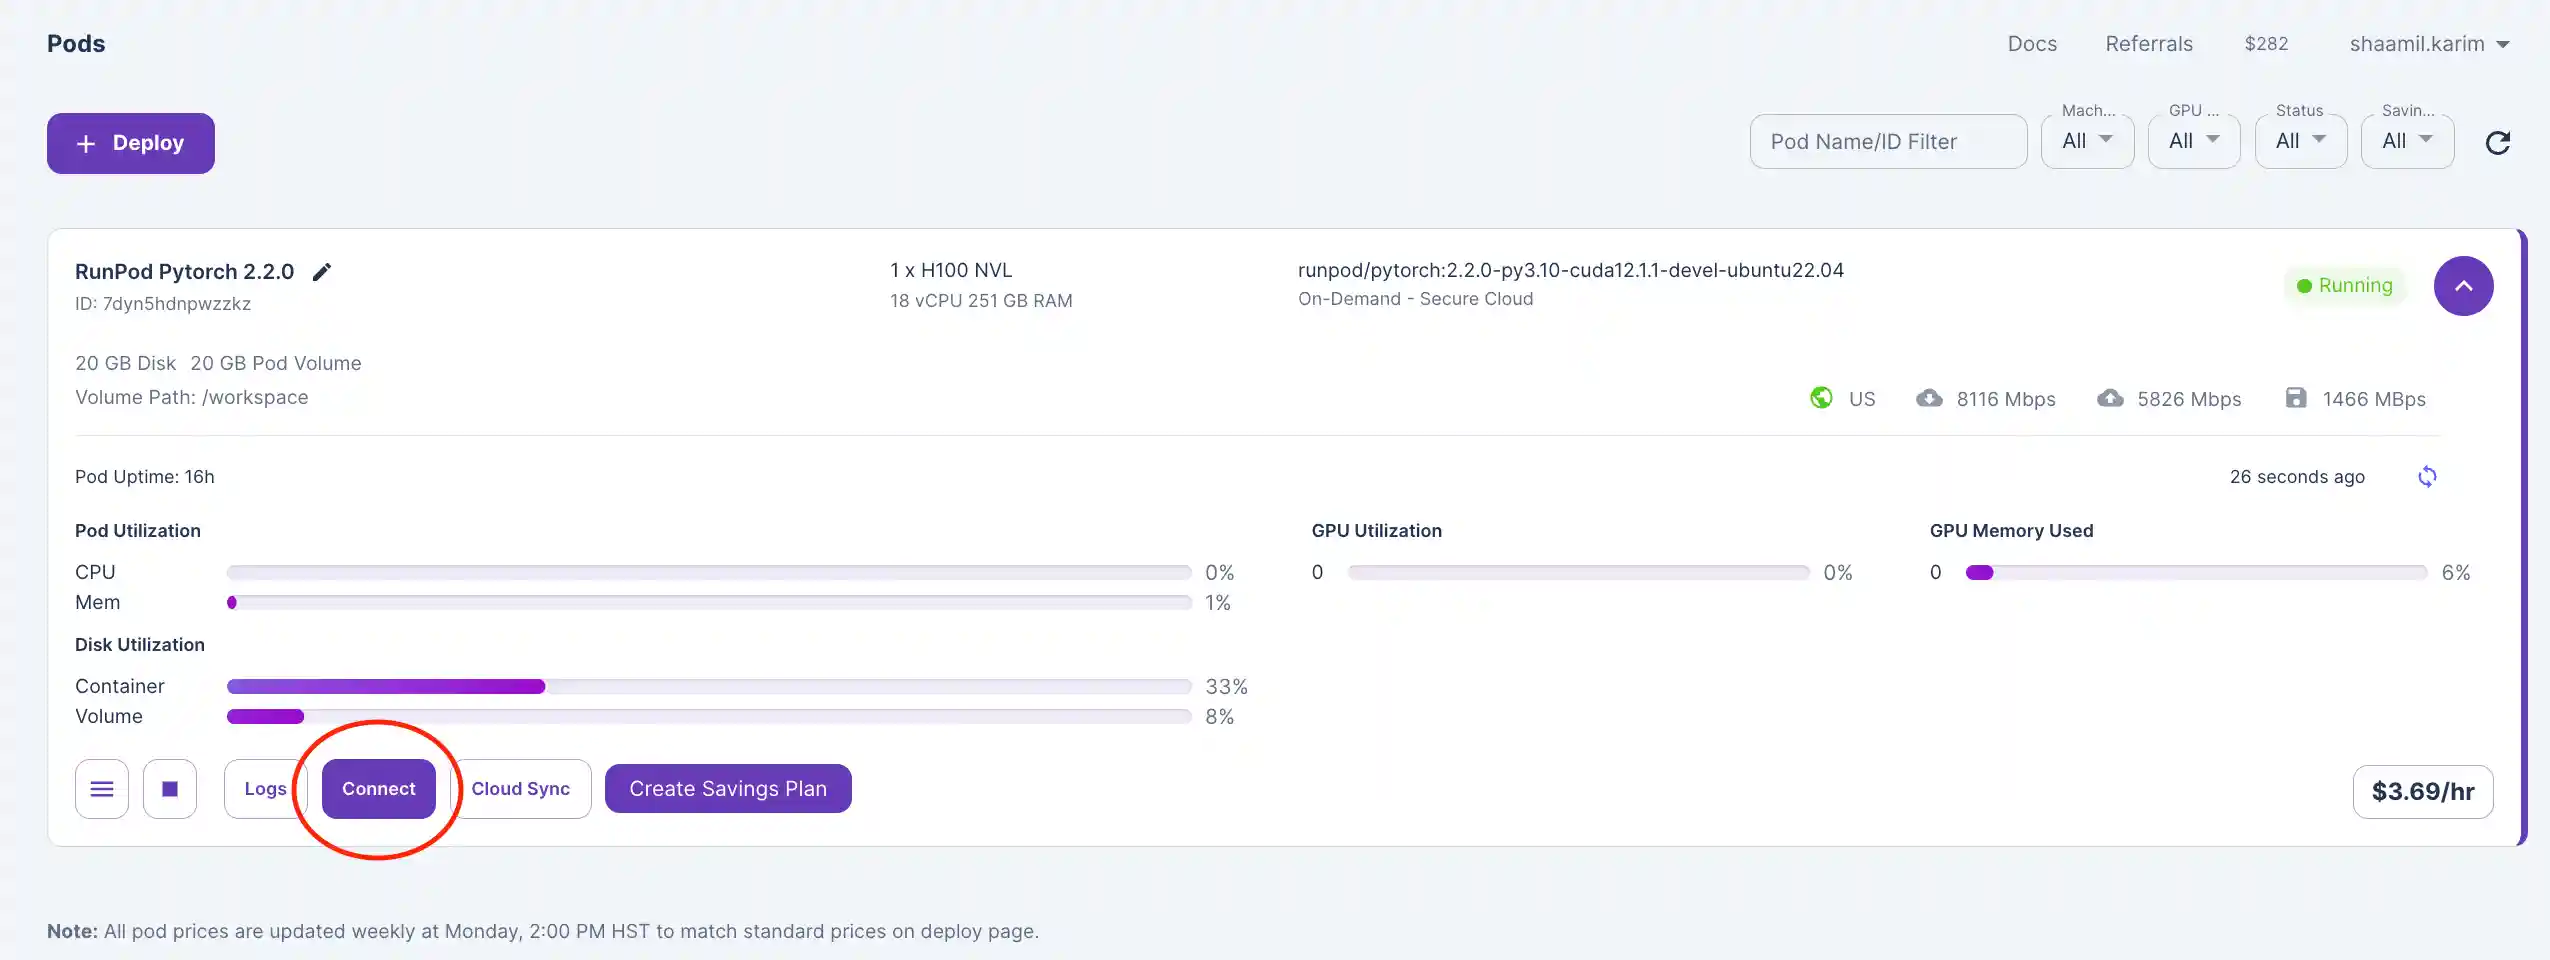
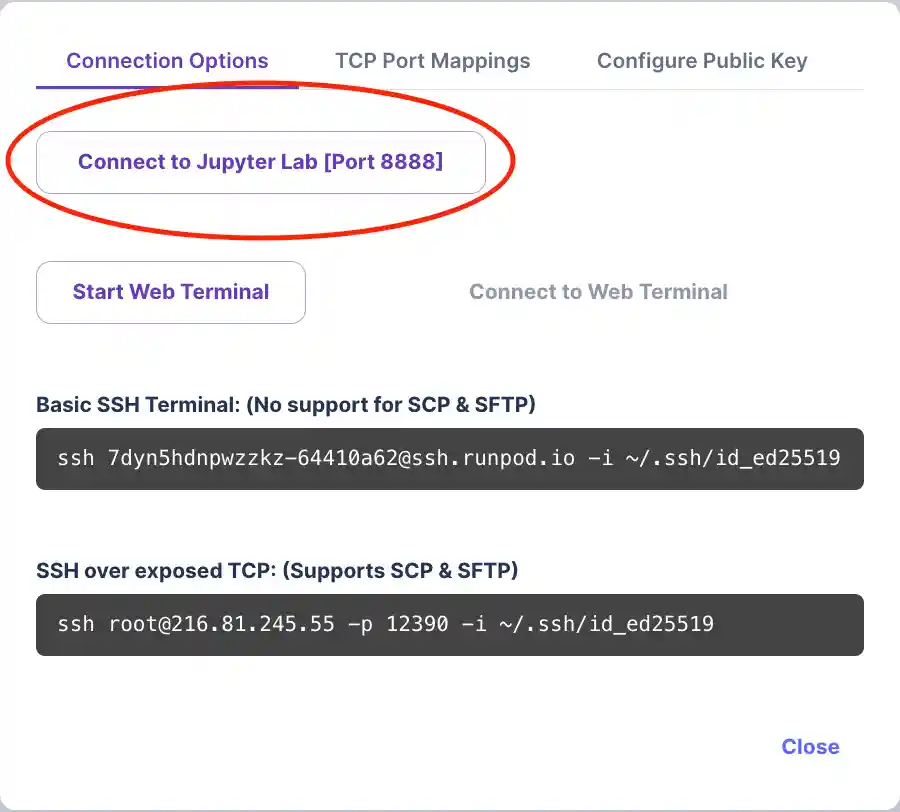
- Open Jupyter Lab: Click on "Connect to Jupyter Lab [Port 8888]."
Running SAM 2 on your GPU Pod
Once you've connected to your jupyter notebook, follow these steps to run SAM 2. If you click on "Connect to Jupyter Lab [Port 8888]" and see an error message, wait a few minutes and try again.
- Clone the Repository: Start by running the following command to clone the SAM 2 GitHub repository.
!git clone https://github.com/facebookresearch/segment-anything-2
- Change Your Working Directory: Navigate to the cloned repository directory to run the subsequent commands.
%cd segment-anything-2
- Install Required Packages: Run the following command to install the necessary packages for SAM 2.
!pip install -e .
- Download Model Checkpoints: Navigate to the checkpoints directory and download the necessary model checkpoints. These pre-trained models are essential for performing segmentation.
%cd checkpoints
!./download_ckpts.sh
- Install Image Processing Libraries: Run the following command to install the necessary libraries for image processing.
!pip install opencv-python-headless
- Initialize and Configure the Model: Run the following code to load your image and model, define the input point prompt, perform inference, and display your final result. Make sure to update the file paths according to the model you are using and the location of your input image (refer to the table below this code for a guide on model file paths).
import torch
import numpy as np
import matplotlib.pyplot as plt
from PIL import Image
from sam2.build_sam import build_sam2
from sam2.sam2_image_predictor import SAM2ImagePredictor

# Define file paths
checkpoint = "./checkpoints/sam2_hiera_large.pt"
model_cfg = "sam2_hiera_l.yaml"
image_path = "../dogg.jpeg"

# Load the image
image = Image.open(image_path).convert("RGB")
image = np.array(image)

# Initialize the predictor
sam2_model = build_sam2(model_cfg, checkpoint, device="cuda")
predictor = SAM2ImagePredictor(sam2_model)

# Process the image to produce an image embedding
predictor.set_image(image)

# Define the input point prompt (x, y) and label (1 for foreground)
input_point = np.array([[200, 100]])
input_label = np.array([1])

# Perform prediction
with torch.inference_mode(), torch.autocast("cuda", dtype=torch.bfloat16):
    masks, scores, _ = predictor.predict(
        point_coords=input_point,
        point_labels=input_label,
        multimask_output=True,
    )

# Sort masks by scores in descending order
sorted_ind = np.argsort(scores)[::-1]
best_mask = masks[sorted_ind][0]

# Display the result
plt.figure(figsize=(10, 10))
plt.imshow(image)

# Overlay the mask
color = np.array([30/255, 144/255, 255/255, 0.6])
h, w = best_mask.shape[-2:]
mask_image = best_mask.astype(np.uint8).reshape(h, w, 1) * color.reshape(1, 1, -1)
plt.imshow(mask_image)

# Show the input point
plt.scatter(input_point[:, 0], input_point[:, 1], color='green', marker='*', s=200, edgecolor='white', linewidth=1.25)

plt.axis('off')
plt.show()
File paths for the different models:
| Model Name | Checkpoint File Path | Configuration File Path |
|---|---|---|
| SAM 2 Tiny | ./checkpoints/sam2_hiera_tiny.pt | sam2_hiera_t.yaml |
| SAM 2 Small | ./checkpoints/sam2_hiera_small.pt | sam2_hiera_s.yaml |
| SAM 2 Base Plus | ./checkpoints/sam2_hiera_base_plus.pt | sam2_hiera_b_plus.yaml |
| SAM 2 Large | ./checkpoints/sam2_hiera_large.pt | sam2_hiera_l.yaml |
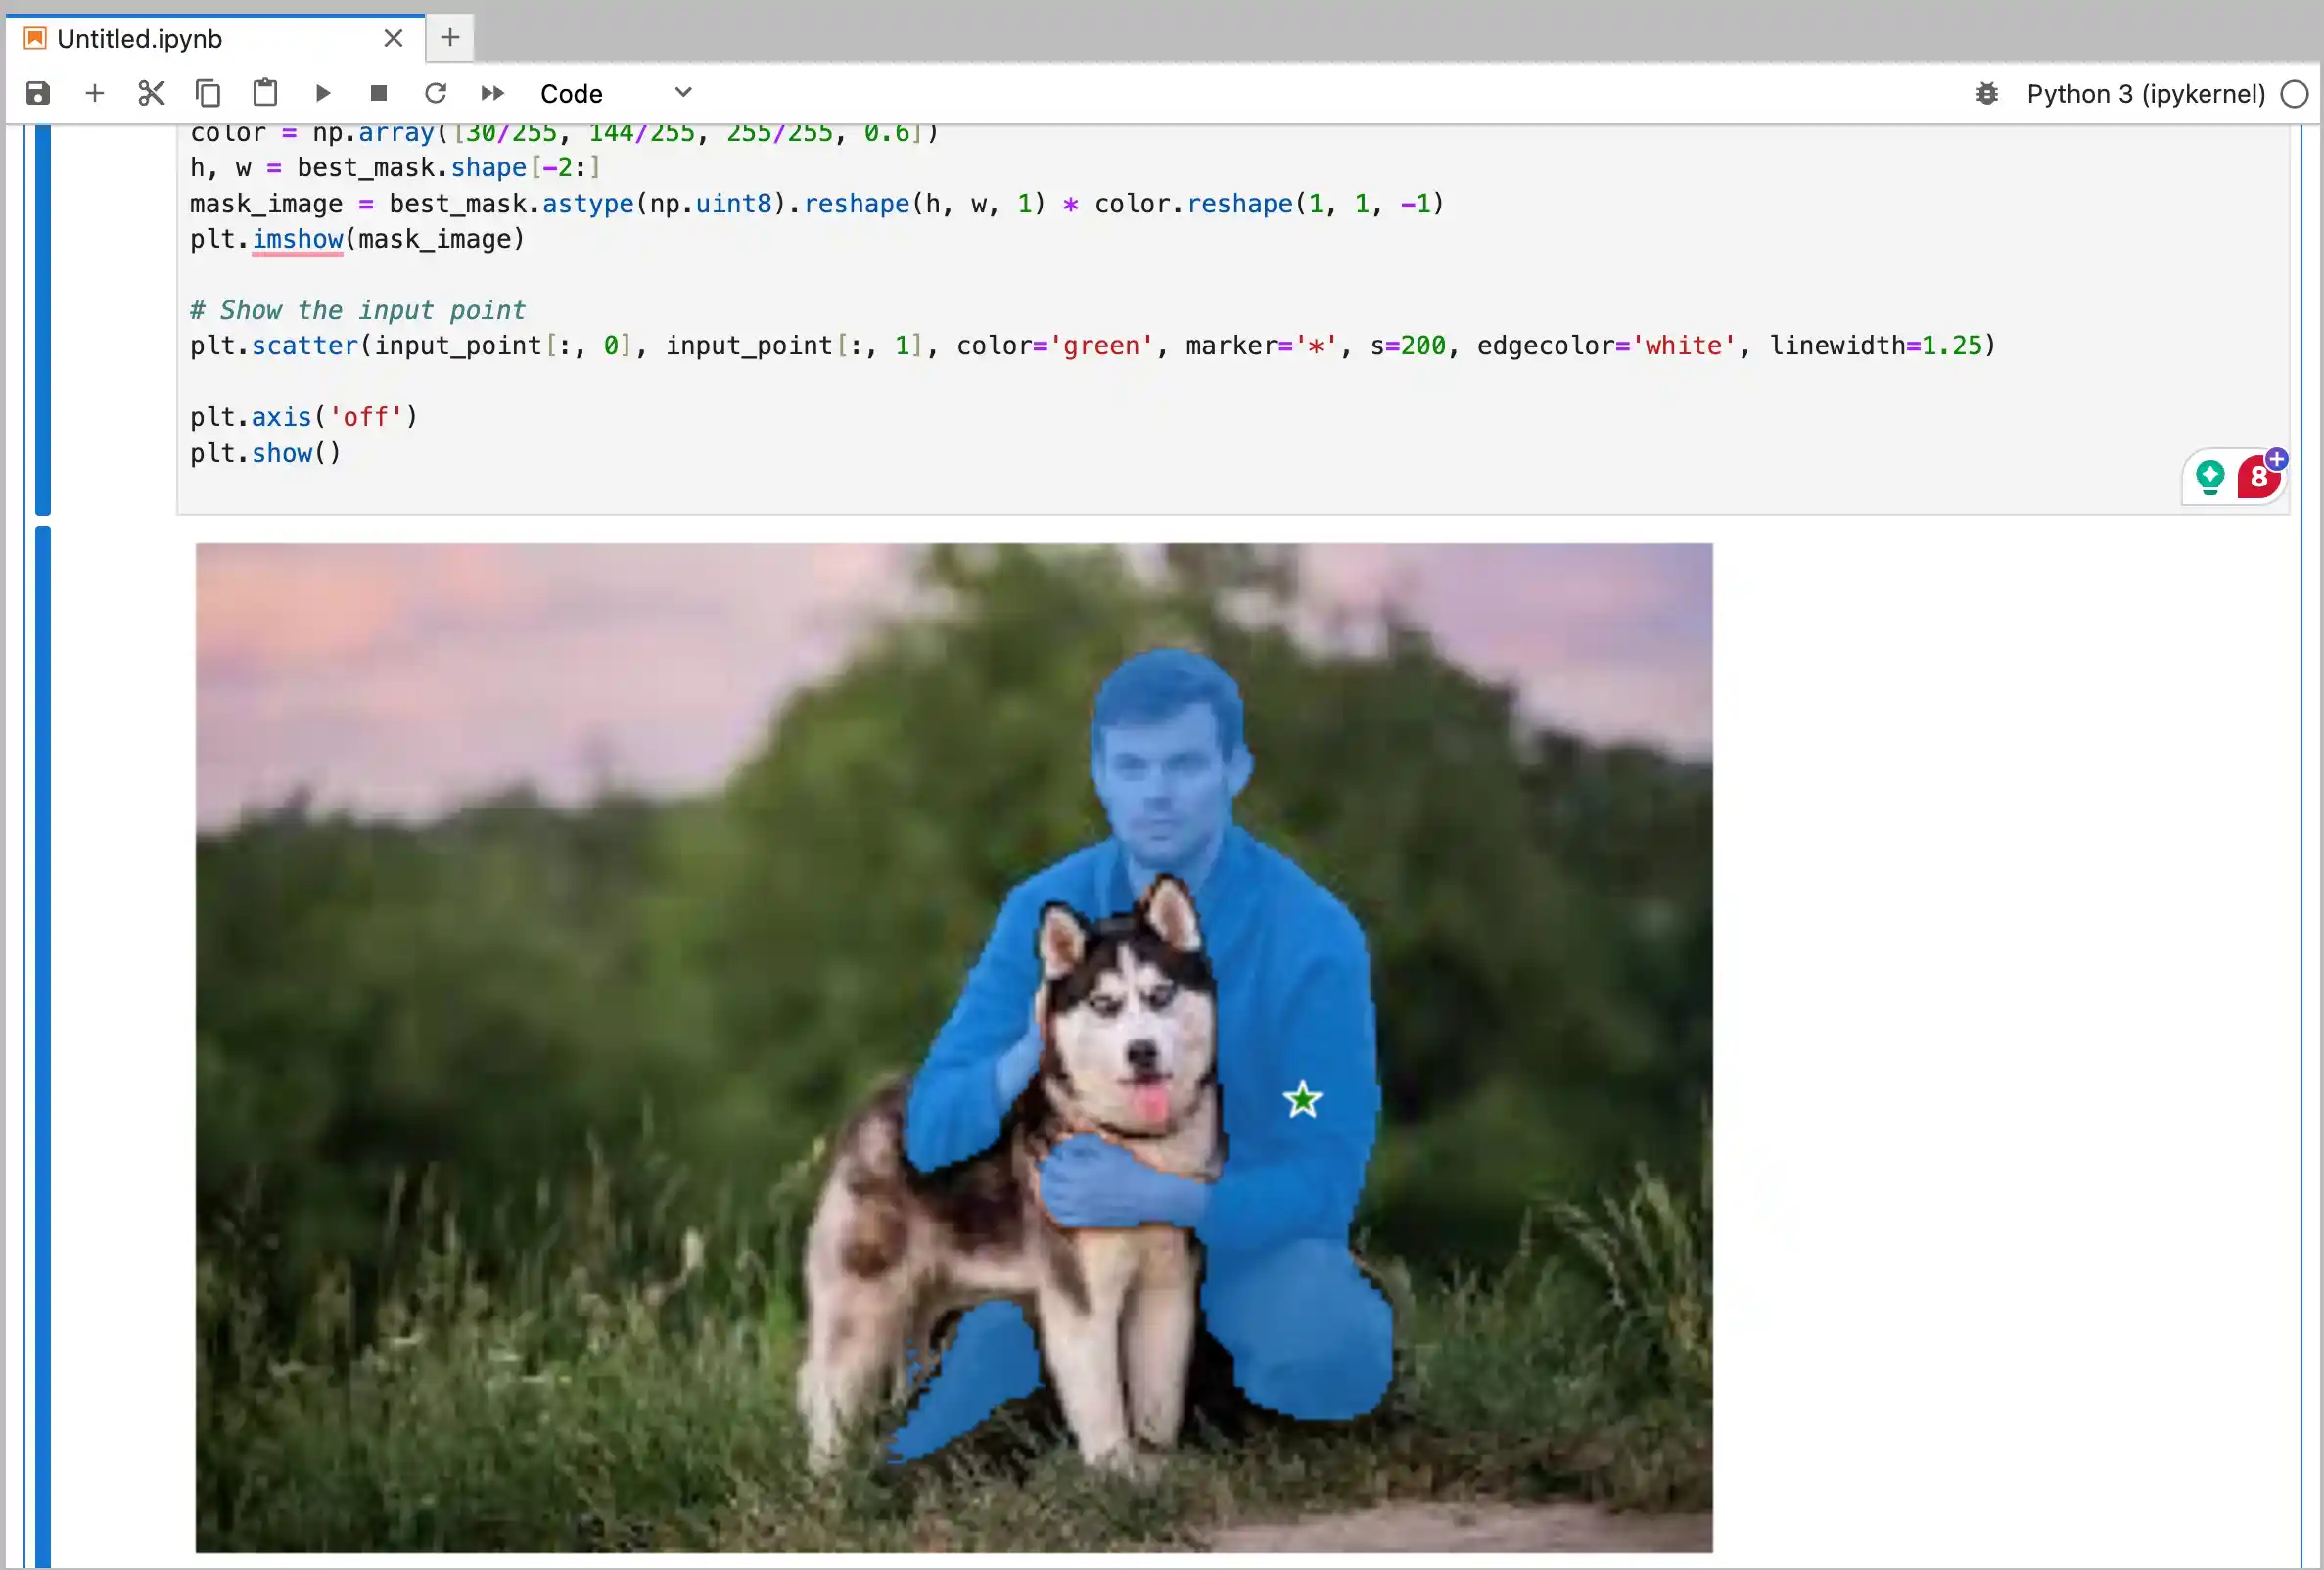
Woohoo! You just ran SAM 2.
You should have achieved the desired output image where the input point (indicated by a star) guides SAM 2 to display a mask over the rest of the segmented object. In this example, the segmented object is the man in the image.
Troubleshooting Tips
By following these troubleshooting tips, you can resolve common issues and ensure a smooth experience running SAM 2 on RunPod. If problems persist, consult the documentation or seek support from the community.
- CUDA Errors:
- Ensure CUDA Compatibility: Verify that your machine has CUDA-compatible hardware and that the correct CUDA drivers are installed.
- Check Installation: Run the following command in your terminal to confirm CUDA installation:
nvidia-smi
- Dependency Conflicts:
- Use Virtual Environments: If you encounter dependency issues during installation, consider using a virtual environment to isolate your project dependencies. You can use
venvorcondafor this purpose- To create and activate a virtual environment using
venv:python -m venv myenvsource myenv/bin/activate # On Windows, use myenv\Scripts\activate
- To create and activate a virtual environment using
- Use Virtual Environments: If you encounter dependency issues during installation, consider using a virtual environment to isolate your project dependencies. You can use
- File Path Errors:
- Double-Check Paths: Verify that the file paths for model checkpoints, configuration files, and images are correctly specified relative to your current working directory.
- Example Path Verification:
python -m pip install --upgrade pip
pip install -r requirements.txt
- Example Path Verification:
- Double-Check Paths: Verify that the file paths for model checkpoints, configuration files, and images are correctly specified relative to your current working directory.
- Library Installation Issues:
- Update Pip: If you face issues with pip installations, try updating pip and then retry installing the required packages:
python -m pip install --upgrade pip
pip install -r requirements.txt
- Update Pip: If you face issues with pip installations, try updating pip and then retry installing the required packages:
Comment below with any problems you may be facing for support – We're here to help you every step of the way!
Conclusion
The SAM 2 model, as demonstrated through our example of segmenting objects in an image, extends its capabilities to videos as well. This powerful model offers extensive opportunities for customization and enhancement, thanks to its open-source nature. Researchers and developers can fine-tune SAM 2 to address specific needs by adjusting the model's parameters and training it on specialized datasets. This adaptability is particularly useful in domains requiring high precision or tailored segmentation performance, including the processing of multiple objects within a single frame.
Additionally, SAM 2's capabilities are not just limited to video segmentation. Its performance in image processing and segmentation is equally impressive, making it a versatile tool for various applications. The ability to handle diverse video content efficiently opens up new possibilities for video processing and analysis.
Hopefully, you found this tutorial helpful, and if you're ready to deploy or fine-tune SAM 2 for your use case, head over to RunPod and unlock the full potential of this cutting-edge segmentation model!