Automated Image Captioning with Gemma 3 on RunPod Serverless

Creating high-quality training datasets for machine learning models often requires detailed image captions. However, manually captioning hundreds or thousands of images is time-consuming and tedious. This tutorial demonstrates how to leverage Google's powerful Gemma 3 multimodal models on RunPod Serverless to automatically generate detailed, consistent image captions. Once this is set up, you can caption images using the platform from literally everywhere; even by simply running a local Python script on your computer.
Why Serverless Captioning?
RunPod Serverless provides the ideal infrastructure for AI image captioning tasks. Unlike traditional setups, serverless requires zero overhead. There's no GPU installation, driver configuration, or environment setup to manage, other than the initial endpoint setup which only takes a few minutes. The platform's flexible scaling automatically allocates resources whether you're processing a single image or thousands, while the pay-per-compute model ensures you're only charged for actual processing time, typically just pennies per image. This approach grants access to cutting-edge Gemma 3 models with up to 27B parameters without requiring the substantial hardware investment these models normally demand. Perhaps most importantly for many users, RunPod offers privacy-preserving processing, keeping your data entirely under your control, unlike many public APIs that may store or use your submitted content.
Prerequisites
Before starting this project, ensure you have a RunPod account with payment information configured, as even serverless functions require credits to execute. You'll also need a Hugging Face account with a read access token since we'll be pulling models from their repository. Make sure to visit the Gemma 3 model page on Hugging Face and accept the license agreement—this grants you permission to use these powerful models in your applications. Finally, we'll be using our GitHub integration to automatically create the endpoint, so you'll want to set up a GitHub account if you don't already have one.
Fork the Repository
Begin by connecting your GitHub account to RunPod through the Settings > Connections > GitHub menu option. This integration allows RunPod to directly deploy code from your repositories. Once connected, navigate to the gemma-captioner-images repository and fork it to your own GitHub account. This creates a personal copy of the codebase that you can modify if needed.
Create the Endpoint
With the repository forked, head to RunPod Serverless and click the New Endpoint button. Select GitHub Repo as your source, then choose your forked gemma-captioner-images repository from the list. This launches the endpoint configuration screen where you'll set the resources for your captioning service.
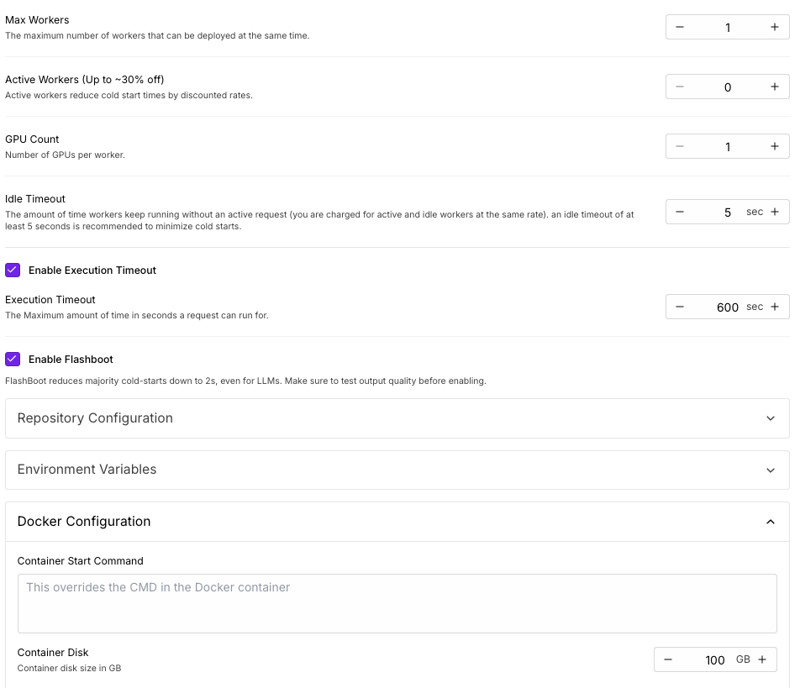
Select an appropriate GPU based on your chosen model—the 1B and 4B variants of Gemma can run effectively on GPUs with 16GB VRAM, while the 12B model requires at least 48GB, and the 27B model needs 80GB or more. Set Active Workers to 0, which means workers will only spin up when you send requests, minimizing idle costs. Configure Max Workers based on your expected batch processing needs—more workers allow faster parallel processing but each incurs its own initialization cost.
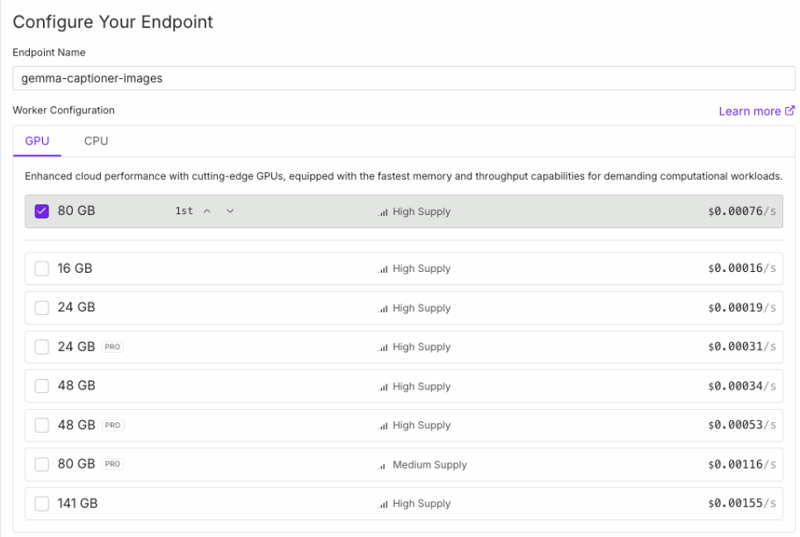
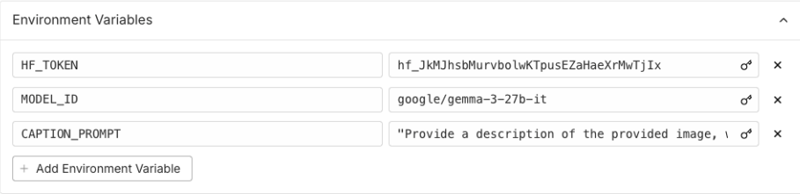
Configure Container Disk to 100GB to ensure sufficient space for the model weights and temporary files. Finally, set up three critical environment variables: HF_TOKEN with your Hugging Face access token for model downloads, MODEL_ID specifying which Gemma variant to use (such as google/gemma-3-27b-it), and CAPTION_PROMPT containing the instructions for how detailed and focused your captions should be.
After creating the endpoint, RunPod will automatically build the container from your repository. This process typically takes a few minutes, after which your endpoint will be ready to accept image captioning requests.
Client-Side Setup
Clone the Repository
Begin by cloning the gemma-captioner-images repository to your local machine. This provides you with the client script necessary to send images to your endpoint. Run the following command in your terminal:
git clone https://github.com/YourUsername/gemma-captioner-images.git
cd gemma-captioner-images
Replace "YourUsername" with your actual GitHub username where you forked the repository.
Prepare Your Images
Create a folder to hold the images you want to caption. This can be done with a simple mkdir command, after which you can copy or move your target images into this directory:
mkdir imagesConfigure the Client Script
The client script requires two key pieces of information to communicate with your RunPod endpoint. First, locate your endpoint ID on the RunPod Serverless dashboard. This is a unique identifier for your captioning service. Second, retrieve your API key from the Settings > API Keys section of the RunPod interface.
You can either hardcode these values in the script by editing the constants at the top, or provide them as command-line arguments when running the script.
# ===== USER MODIFIABLE SETTINGS =====
# Your RunPod endpoint ID
ENDPOINT_ID = "YOUR_ENDPOINT_ID"

# Your RunPod API key
API_KEY = "YOUR_API_KEY"

# Maximum concurrent requests
MAX_CONCURRENT = int(os.environ.get("MAX_CONCURRENT", "5"))

# Polling interval in seconds for async requests
POLLING_INTERVAL = int(os.environ.get("POLLING_INTERVAL", "2"))
# =====================================
Running the Captioner
With your setup complete, running the captioning process is straightforward. Execute the script with your images folder path, endpoint ID, and API key (unless you provided them in the code itself)
python image-captioner.py --image_folder images --endpoint_id YOUR_ENDPOINT_ID --api_key YOUR_API_KEYUpon execution, the script first scans your specified folder for supported image files. It then creates a thread pool to manage concurrent requests, allowing multiple images to be processed simultaneously. For each image, the script converts it to base64 format and sends it to your RunPod endpoint.
When using the default asynchronous mode, the script submits each image for processing and immediately proceeds to the next one without waiting. It then monitors the status of all submitted jobs, reporting progress as they complete. If you prefer synchronous processing (useful for debugging), add the --sync flag, which will process images one at a time and wait for each result before proceeding.
As captions are generated, the script saves them to text files with names matching the original images. For example, if you process "sunset.jpg," the caption will be saved as "sunset.txt" in the same directory. This format is particularly useful for machine learning datasets, as many training frameworks expect image-caption pairs to share the same base filename.
Understanding the Costs
The captioning process incurs costs in two distinct phases. First is the cold start phase—when a worker initializes for the first time, it downloads the model and prepares the environment. This takes approximately 3-4 minutes for the largest Gemma-3-27B-IT model, costing around $0.20-0.25 for the initialization. Smaller models complete this phase more quickly and at lower cost. The second phase is the per-image processing time, which typically takes just 1-5 seconds per image for the 27B-parameter model (roughly $0.01-0.05 per image) and even less for smaller models.
To optimize costs, consider using smaller models for straightforward captioning tasks—the 1B or 4B variants often produce excellent results for many applications while costing significantly less. Batching multiple images in a single job amortizes the cold start cost across more images. Setting Max Workers to 1 for small jobs prevents multiple cold starts from occurring simultaneously, which is especially important when processing just a few images.
Customizing Caption Style
The environment variable CAPTION_PROMPT gives you precise control over the style and focus of your generated captions. When setting up your endpoint, you can tailor this prompt to emphasize different aspects of the images. For comprehensive visual descriptions, you might use: "Describe all visual elements in the image in detail, including colors, composition, and lighting." If your dataset needs to focus on subjects, try: "Focus on describing the main subject of the image, their appearance, clothing, and pose." For training models that need environmental context, consider: "Provide a detailed description of the setting and background elements in this image."
Detailed Code Walkthrough
Let's examine how the client script interacts with RunPod's serverless infrastructure by exploring key components of the image captioning system. Understanding these mechanics will help you customize the solution for your specific needs or build similar serverless workflows.
Image Processing and Encoding
The foundation of any image API request is properly preparing the image data. Our script converts images to base64 format, which allows binary image data to be transmitted as text in JSON payloads:
def encode_image_to_base64(image_path):
    """Load an image and convert it to base64."""
    try:
        with Image.open(image_path) as img:
            # Convert to RGB mode if needed
            if img.mode != "RGB":
                img = img.convert("RGB")

            # Save to bytes buffer
            buffer = BytesIO()
            img.save(buffer, format="JPEG")

            # Encode to base64
            encoded_image = base64.b64encode(buffer.getvalue()).decode('utf-8')
            return encoded_image
    except Exception as e:
        print(f"Error encoding image {image_path}: {str(e)}")
        return None
This function handles several important tasks: opening the image file using PIL, ensuring it's in RGB format (which helps avoid issues with RGBA or other color modes), saving it to a BytesIO buffer, and finally encoding it to base64 with proper UTF-8 decoding. The error handling ensures that problems with individual images don't crash the entire processing batch.
Serverless Communication: Synchronous vs. Asynchronous
The script supports two methods of communicating with RunPod's API, each with different advantages:
Synchronous Requests
def send_request_sync(image_path, args):
    """Send a synchronous request to the RunPod API."""
    try:
        image_name = os.path.basename(image_path)
        print(f"Processing {image_name}...")

        # Encode image
        base64_image = encode_image_to_base64(image_path)
        if not base64_image:
            return

        # Prepare API request
        url = f"https://api.runpod.ai/v2/{args.endpoint_id}/runsync"
        headers = {
            "Authorization": f"Bearer {args.api_key}",
            "Content-Type": "application/json"
        }
        payload = {
            "input": {
                "image": base64_image
            }
        }

        # Send request and wait for response
        response = requests.post(url, headers=headers, json=payload)
        response.raise_for_status()
        result = response.json()

        # Save caption
        image_base = os.path.splitext(image_path)[0]
        output_path = f"{image_base}.txt"

        with open(output_path, 'w', encoding='utf-8') as f:
            f.write(result['output']['caption'])

        print(f"Caption saved to {output_path}")

    except Exception as e:
        print(f"Error processing {image_path}: {str(e)}")
The synchronous method makes a single request to the /runsync endpoint and waits for the complete response. This approach is simpler but blocks until the processing completes, which can be inefficient for large images or when the serverless function has a cold start.
def send_request_async(image_path, args):
    """Send an asynchronous request to the RunPod API and poll for results."""
    try:
        image_name = os.path.basename(image_path)
        print(f"Processing {image_name}...")

        # Encode image
        base64_image = encode_image_to_base64(image_path)
        if not base64_image:
            return

        # Submit job to /run endpoint
        url = f"https://api.runpod.ai/v2/{args.endpoint_id}/run"
        headers = {
            "Authorization": f"Bearer {args.api_key}",
            "Content-Type": "application/json"
        }
        payload = {
            "input": {
                "image": base64_image
            }
        }

        # Send request
        response = requests.post(url, headers=headers, json=payload)
        response.raise_for_status()
        result = response.json()

        job_id = result.get('id')
        if not job_id:
            print(f"Error: No job ID returned for {image_name}")
            return

        # Poll for results
        status_url = f"https://api.runpod.ai/v2/{args.endpoint_id}/status/{job_id}"

        while True:
            time.sleep(POLLING_INTERVAL)
            status_response = requests.get(status_url, headers=headers)
            status_response.raise_for_status()
            status_data = status_response.json()

            status = status_data.get('status')

            if status == 'COMPLETED':
                # Save caption
                image_base = os.path.splitext(image_path)[0]
                output_path = f"{image_base}.txt"

                caption = status_data.get('output', {}).get('caption')
                if caption:
                    with open(output_path, 'w', encoding='utf-8') as f:
                        f.write(caption)
                    print(f"Caption saved to {output_path}")
                else:
                    print(f"No caption received for {image_name}")
                break

            elif status in ['FAILED', 'CANCELLED']:
                print(f"Job {status.lower()} for {image_name}: {status_data.get('error')}")
                break

            elif status in ['IN_QUEUE', 'IN_PROGRESS']:
                print(f"Job status for {image_name}: {status}")

            else:
                print(f"Unknown status for {image_name}: {status}")

    except Exception as e:
        print(f"Error processing {image_path}: {str(e)}")
The asynchronous approach is more sophisticated. It submits a job to the /run endpoint and receives a job ID immediately. Then it periodically polls the /status/{job_id} endpoint to check progress. This non-blocking approach allows the client to submit multiple images in parallel and monitor their progress independently, which is particularly efficient for batch processing. The polling loop includes comprehensive status handling for completed, failed, cancelled, queued, and in-progress states.
Parallel Processing with ThreadPoolExecutor
To maximize throughput, the script uses Python's ThreadPoolExecutor to process multiple images concurrently:
def main():
    """Main function to run the client."""
    args = parse_arguments()

    # Validate arguments and print configuration...

    # Get list of image files
    supported_formats = ['.jpg', '.jpeg', '.png', '.bmp', '.webp']
    image_files = [
        os.path.join(args.image_folder, f) for f in os.listdir(args.image_folder)
        if os.path.splitext(f.lower())[1] in supported_formats
    ]

    print(f"Found {len(image_files)} images to process")

    # Select request function based on args
    request_fn = send_request_sync if args.sync else send_request_async

    # Process images in parallel
    with ThreadPoolExecutor(max_workers=args.concurrent) as executor:
        futures = [executor.submit(request_fn, image_path, args) for image_path in image_files]
        for future in futures:
            future.result()  # Wait for all requests to complete

    print("All captions generated successfully")
The ThreadPoolExecutor creates a pool of worker threads (specified by the --concurrent parameter) that process images in parallel. This is different from the serverless workers—these are local threads in the client script that manage multiple API connections simultaneously. The executor.submit() function queues up all the image processing tasks, and the future.result() loop ensures the script waits for all tasks to complete before exiting.
RunPod Serverless Endpoint Handler
While the client script handles the request side, the serverless endpoint (defined in your forked GitHub repo) is responsible for processing the requests. The core of this handler is a Python function that:
- Downloads and initializes the Gemma model on first request
- Takes base64-encoded images from the requests
- Decodes them and prepares them for the model
- Runs inference using the specified captioning prompt
- Returns the generated caption
This approach means the compute-intensive work happens in the cloud, while your local machine only needs to handle file operations and API communication. The serverless endpoint automatically scales based on demand, spinning up new workers as needed and shutting them down when idle to minimize costs.
This combination of client-side efficiency and serverless flexibility creates a system that can handle anything from a few images to production-scale datasets with minimal configuration.
Example Results
The quality of captions generated by Gemma 3 models demonstrates why they're ideal for creating training datasets. Here's an example of how the Gemma-3-27B-IT model describes a wildlife photograph:
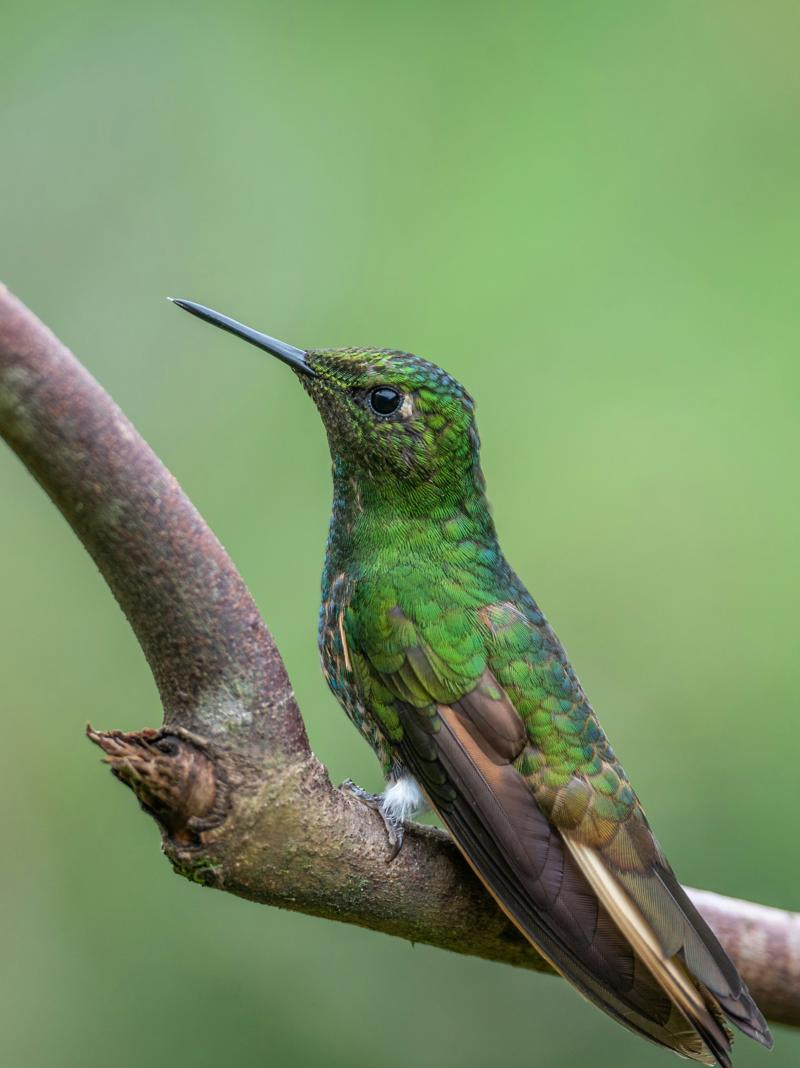
The photograph features a stunning hummingbird perched delicately on a slender, brown branch. The bird is the clear focal point, exhibiting a vibrant, iridescent green plumage that covers most of its body. This green isn't a flat color; it's a complex interplay of shades, with hints of emerald, olive, and even a touch of teal, creating a shimmering effect as if the feathers are catching the light. The head is a darker, more textured green, and a striking black eye gives the bird an alert and intelligent expression. Its long, slender, and slightly curved black beak is pointed forward, suggesting it might be scanning for nectar sources. Below the green, the bird's underside transitions into a rich, warm brown, and its tail feathers display a beautiful gradient of dark brown edged with a golden-bronze hue. A small patch of white feathers is visible on its lower belly, providing a subtle contrast. The branch the hummingbird is perched on is textured and appears to be a part of a larger, woody plant. It curves gently, providing a natural and secure resting spot for the bird. The background is a soft, blurred wash of green, likely foliage, which creates a pleasing bokeh effect.
Conclusion
By combining Google's Gemma 3 models with RunPod's serverless infrastructure, we've created a powerful, scalable solution for automatic image captioning. This approach addresses one of the most tedious aspects of machine learning dataset preparation, transforming what was once a manual, time-consuming process into an efficient, automated workflow.
The serverless architecture eliminates the traditional barriers to using advanced AI models—no need to purchase expensive GPUs, configure complex environments, or manage computational resources. Instead, the system scales automatically to meet your needs, from a handful of personal photos to enterprise-scale datasets with thousands of images.
Privacy preservation remains a key advantage of this approach compared to public API services. Your images are processed in isolated containers that are destroyed after use, with no data retention. This makes the solution suitable even for sensitive or proprietary content that couldn't be sent to general-purpose vision APIs.
Questions? Feel free to drop by our Discord!