Announcing RunPod’s Integration with SkyPilot

RunPod is excited to announce its latest integration with SkyPilot, an open-source framework for running LLMs, AI, and batch jobs on any cloud. This collaboration is designed to significantly enhance the efficiency and cost-effectiveness of your development process, particularly for training, fine-tuning, and deploying models.
What is SkyPilot?
SkyPilot is a powerful framework for running AI models and batch jobs on any cloud and Kubernetes environment. As a user, once you connect your cloud credentials via the CLI tool, you can seamlessly aggregate the most cost-effective compute options across different clouds.
SkyPilot originates from UC Berkeley’s Sky Computing—a paradigm that enables workloads to run on one or more cloud providers transparently. With SkyPilot, AI teams can use multiple clouds/infra as a single compute pool. SkyPilot automatically sends AI workloads to the cheapest and most available cloud (hint: This is where RunPod is often the top choice!) to execute and orchestrate the jobs/services.
With this integration, RunPod is joining the AI “Sky”.
How Does RunPod Fit In?
This new integration leverages the RunPod CLI infrastructure that was recently launched, streamlining the process of spinning up on-demand pods and deploying serverless endpoints. With this tool, accessing and managing RunPod’s GPU cloud resources becomes incredibly easy and efficient.
Getting Started with RunPod on SkyPilot
To begin using RunPod with SkyPilot, follow these steps:
- Obtain Your API Key: First, visit the RunPod settings page at RunPod Settings to get your API key. If you haven’t created an account yet, you must do so before obtaining your API key.
- Install RunPod: Use the command
pip install "runpod>=1.5.1"to install the latest version of RunPod. - Configure RunPod: Enter RunPod config into your CLI and paste your API key into the RunPod configuration prompt.
- Install SkyPilot RunPod Cloud: Execute
pip install "skypilot-nightly[runpod]"to install the SkyPilot RunPod cloud. - Verify Your Setup: Run sky check to ensure that your credentials are correctly set up and you're ready to go.
After setting up your environment, you can seamlessly spin up a cluster in minutes:
- Create a New Project Directory: Run
mkdir hello-skyto create a new directory for your project. - Navigate to Your Project Directory: Change into your project directory with
cd hello-sky. - Create a Configuration File: Enter
cat > hello_sky.yamland input the following configuration details:
resources:
  cloud: runpod

# Working directory (optional) containing the project codebase.
# Its contents are synced to ~/sky_workdir/ on the cluster.
workdir: .

# Setup commands (optional).
# Typical use: pip install -r requirements.txt
# Invoked under the workdir (i.e., can use its files).
setup: |
  echo "Running setup."

# Run commands.
# Typical use: make use of resources, such as running training.
# Invoked under the workdir (i.e., can use its files).
run: |
  echo "Hello, SkyPilot!"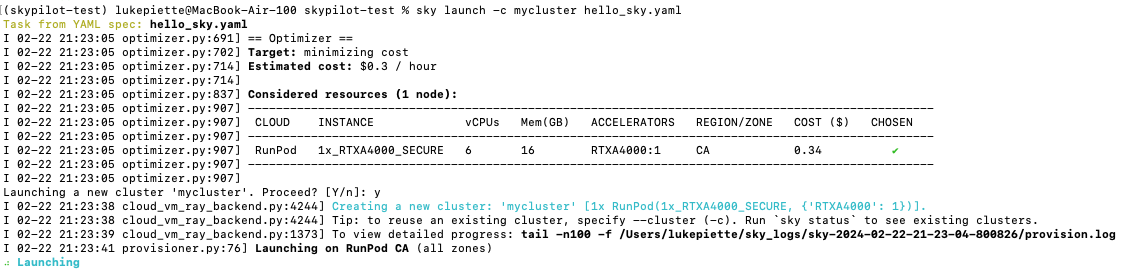
conda env list- Launch Your Project: With your configuration file created, launch your project on the cluster by running
sky launch -c mycluster hello_sky.yaml. - Confirm Your GPU Type: You should see the available GPU options on Secure Cloud appear in your command line. Once you confirm your GPU type, your cluster will start spinning up.
RunPod and SkyPilot's Ongoing Partnership
The team at RunPod is honored to have worked alongside the brilliant folks at SkyPilot. Special thanks to Zongheng, Zhanghao, Wei-Lin, and the rest of the SkyPilot team for making this possible.
RunPod is committed to continue working together with SkyPilot, further simplifying the challenges of cloud resource utilization for developers everywhere.
PS: If you have any feedback about the SkyPilot integration and/or CLI tool, message @LukePiette on Twitter or @lukepiette on Discord. We’d love to hear what you think!